Build a beautiful Instagram feed that displays your products, vision, and brand beautifully for your audience to see!
“Make visible what, without you, might perhaps never have been seen.”
Robert Bresson
Have you ever wondered how to organize a gorgeously cohesive feed that shows off your brand and the very essence of your business?
You may be wondering, “Does having a beautiful Instagram feed really matter?” The answer is YES, girl! A million times, YES! Your Instagram feed is a reflection of you and your business. If you want people to follow you, fall in love with your product, and ultimately buy what you are offering, then you must appeal to your audience!
Think of it this way. You walk into a brick and mortar boutique. It’s dark inside. You think they are selling clothing, but it’s hard to tell. You pick up a tank top and wonder if it’s blue or purple? Another one looks green, but it could be yellow? Is that ruffle or fringe on the hem? Nothing is organized. The store is messy and unkempt. Are you going to end up making a purchase? Are you even going to come back? NO! No one would want to buy anything in a store like that much less become a faithful, returning customer! Your Instagram feed is no different!
Your Instagram feed is your business’s storefront! You want it to be a beautiful and attractive place! You want your branding to reflect in your color scheme, and you want it to be organized (not cluttered with goofy memes or unrelated pictures). I can personally tell you that I will not follow an Instagram account with an ugly feed. That may sound snooty to you, but I want my Instagram feed to be beautiful and inspiring. I don’t want to scroll through ugly pictures any more than I want to walk through an ugly store!
Instagram is a place where you can curate a beautiful gallery of photos that represent your brand, your vision, and your business! While so much goes into curating a beautiful Instagram feed, I am going to cover three tips that will go a long way towards helping you…
…show the world who you are!

Tip #1 – Use a Filter
Why?
One of the most effective ways of curating a cohesive feed is to use the same filter on all of your photos before uploading them to Instagram. A filter will give all of your pictures a common element. Even if the color schemes, backgrounds, and focal points are all different, a filter brings it all together to create an overall uniform look.
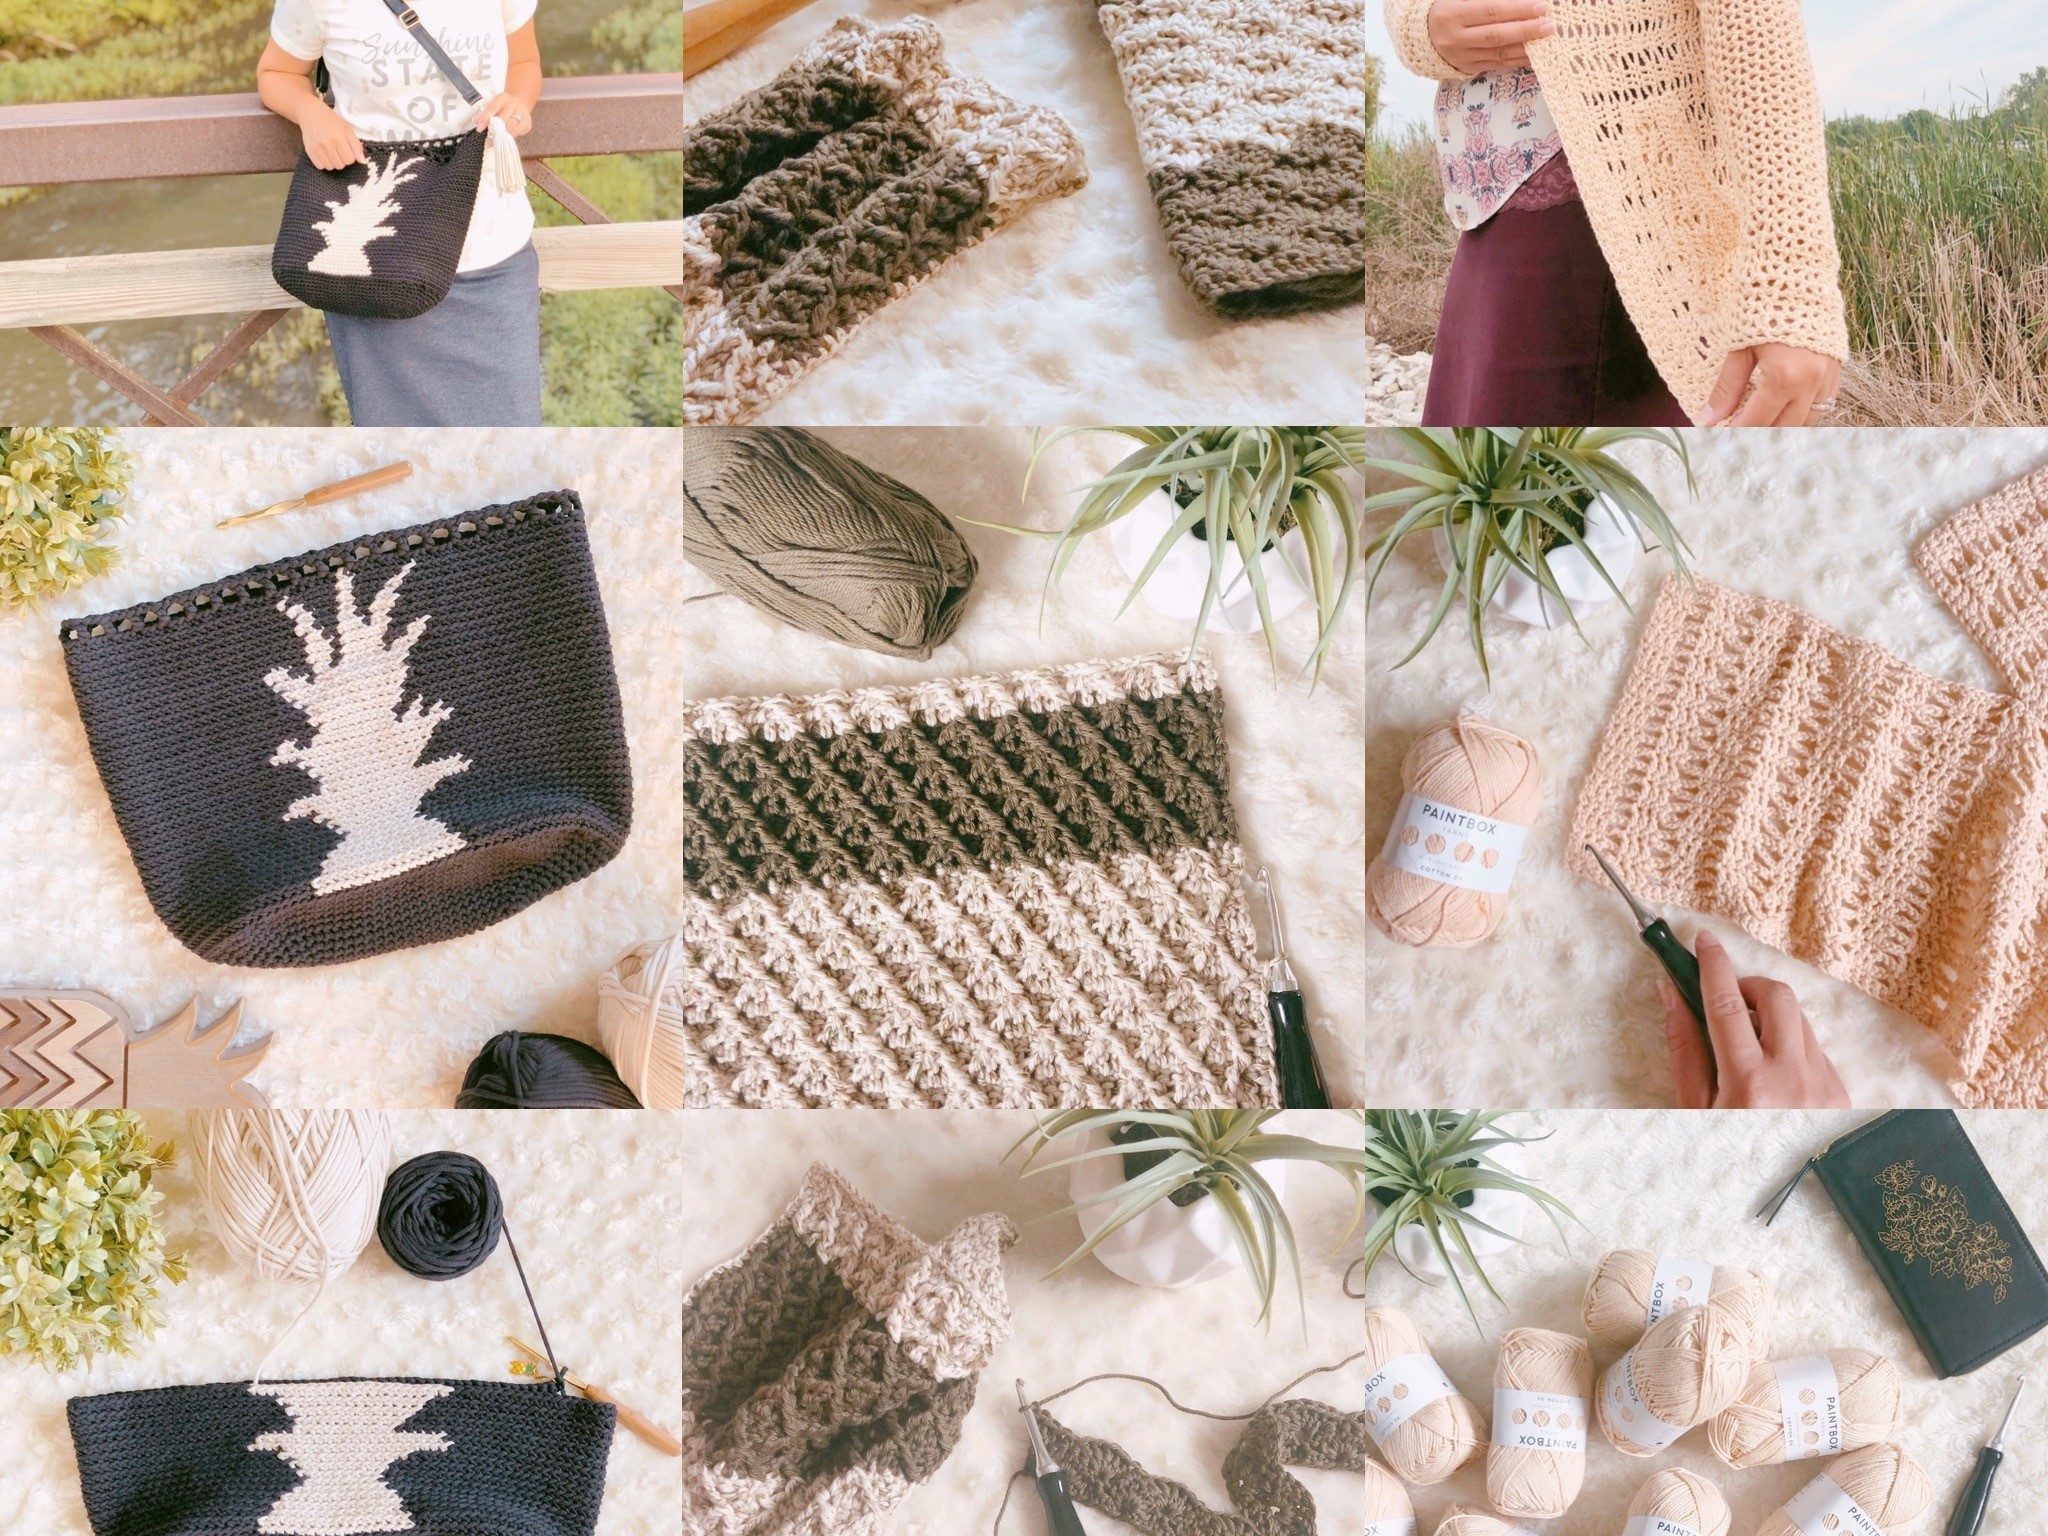
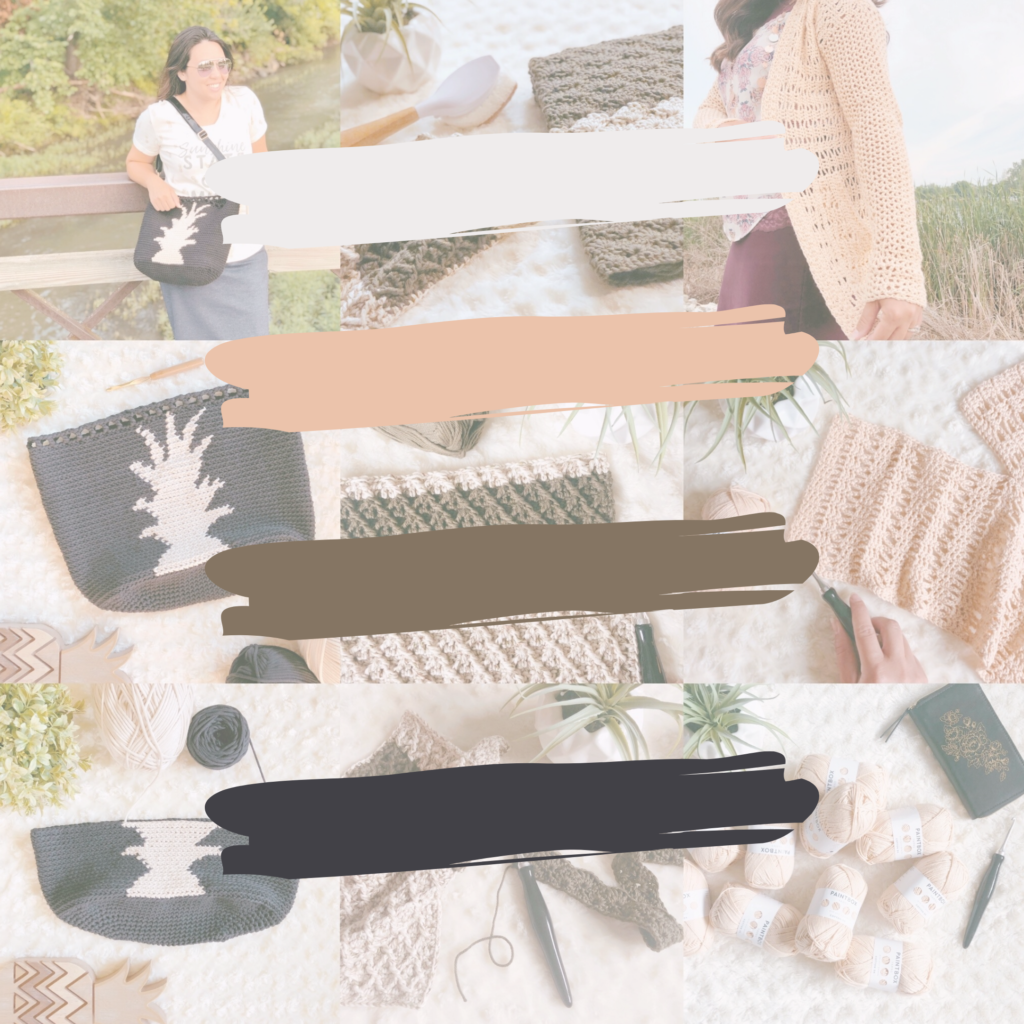
The following grid is a recreation of a sequence of pictures from my feed WITHOUT my filter. Each picture is bright and well-lit, but they don’t flow nicely one from the other. Especially since the color schemes are vastly different.

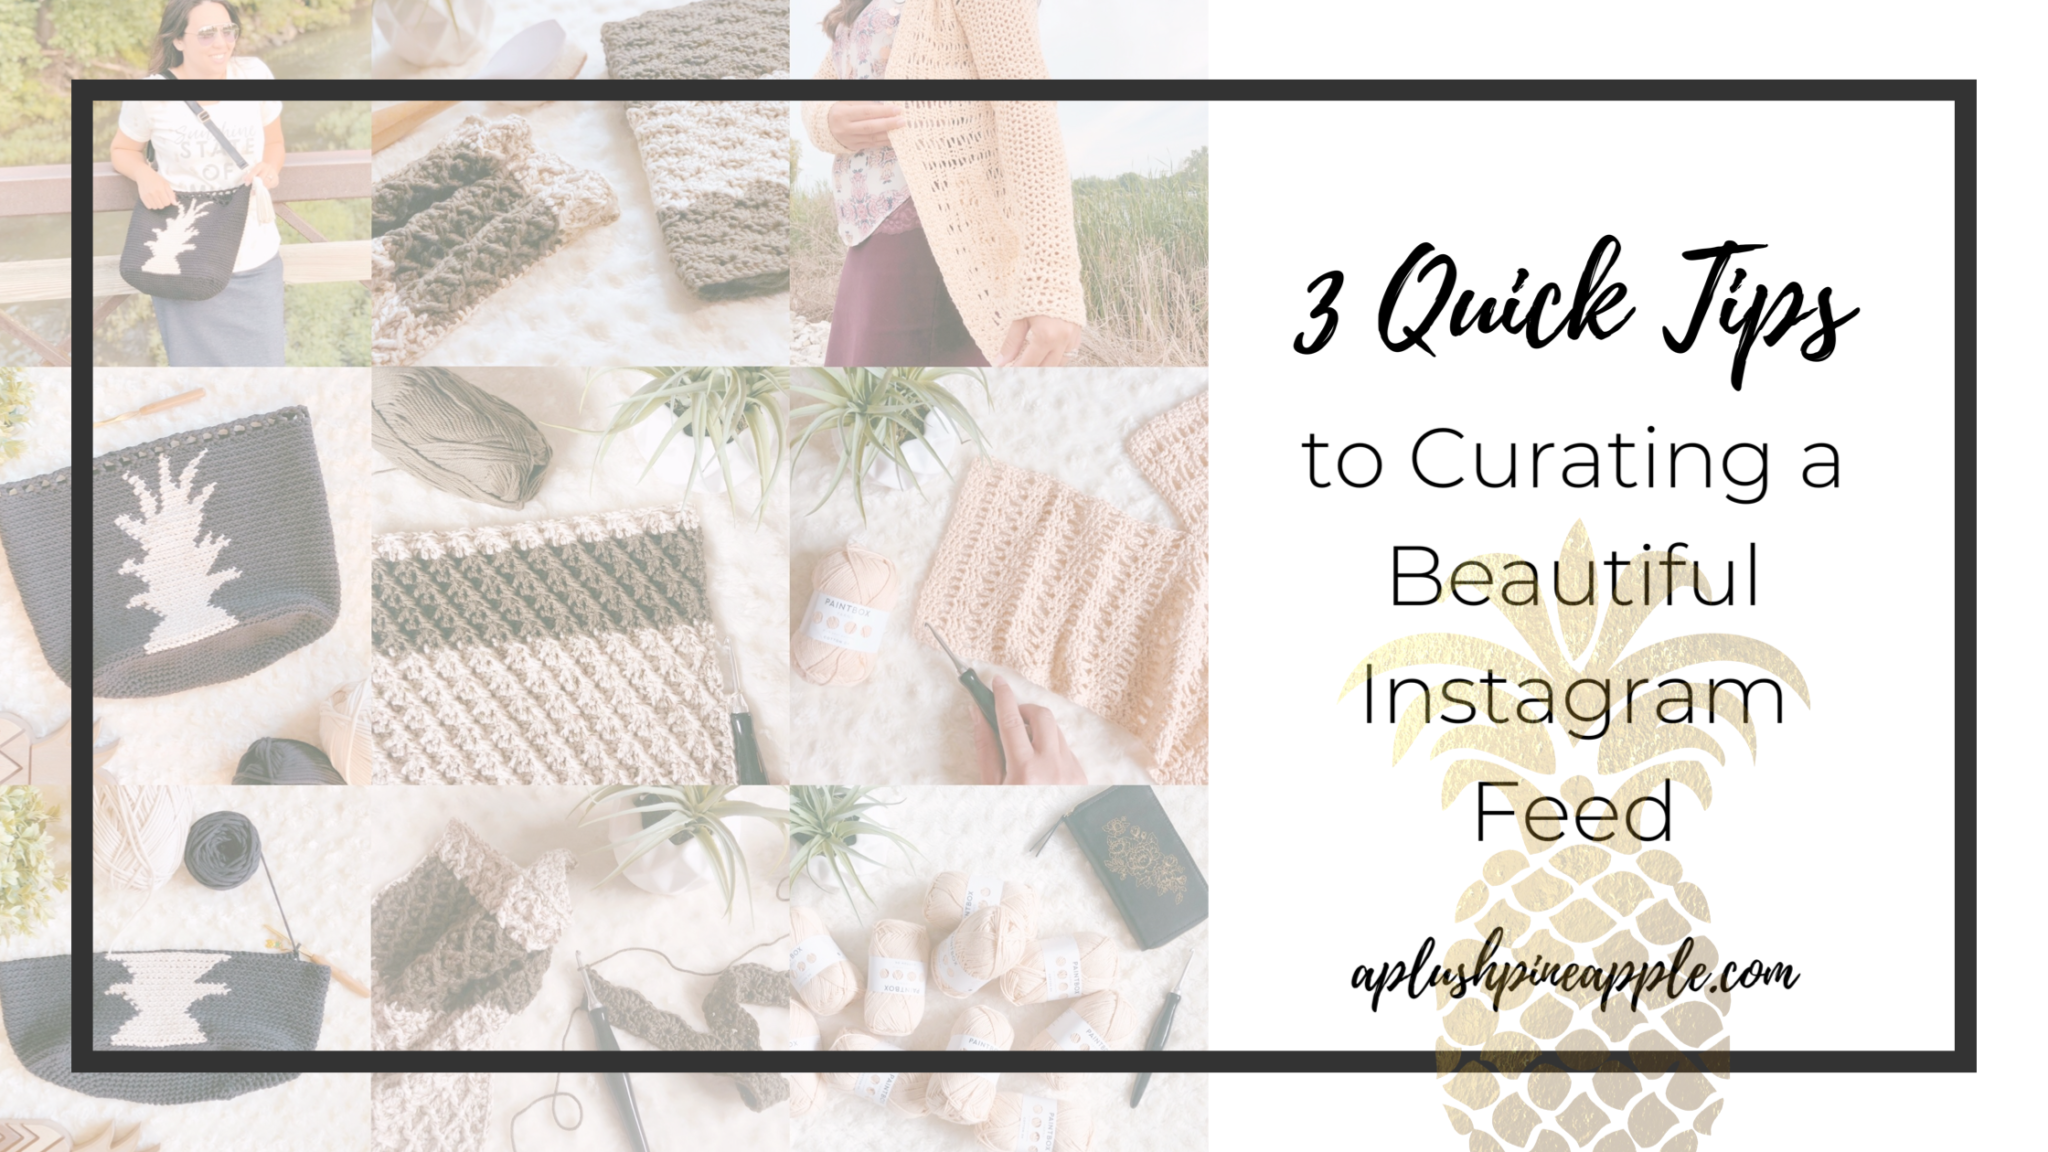
Here is the actual sequence of the exact same pictures the way you will find them on my Instagram feed. Notice how cohesive the grid is. Even though the pictures are all very different, the transition between them is smooth and fluid. Instead of your eye being drawn to any harsh bright spots, you are able to focus on the content!
How?
Choosing a filter is a tricky process. I’ve known people to spend embarrassing amounts of money on the filter-choosing process, so before you go downloading all the pretty filters, take the following things into consideration.
- What vibe/theme are you going for? If you are a summer-lovin’, tropical-crazy, pineapple-flingin’ kinda girl (*takes a bow*) then you want a filter that has warm, glowing tones. If you are a mountains, lakes, rivers, and cabins kinda girl, then choose one that has crisp details and a cooler temperature.
- How does it look on a variety of pictures? Some filters look great on flat lays and inanimate objects, but then they wreak havoc on skin tones. Strong crisp lines and shadows look great on crochet because it outlines the stitch detail, but think about the effect those same elements will have on your under-eye circles and…dare I say…wrinkles…gasp!
- What are your options? You may not be ready to invest a single dime into having a filter on your feed and that is totally fine! (Although, I guarantee that it is worth it.) There are still lots of free options out there. Your phone probably offers a few basic filters, and there are many apps out there that offer filters on the free version. Just remember that you will get what you pay for! I personally use Color Story. There are some free filters on this app, but I have paid for a few filter packages, and I love the ones that I have! You can also buy presets on Etsy!
If you decide that a filter is not for you, there are other options! If you can use the editing process to tweak each photo a certain way before posting, you can get the same results as you would if you were to use a filter. Ashley of A Crafty Concept does this with her photos! She has her editing process memorized, and she adjusts each photo the same way! There is no one process that is right for everyone, so experiment with what works for you and appeals to your audience the most!
Tip # 2 – Choose a Color Palette
Why?
Using a color palette in your Instagram feed will automatically cause your photos to seem cohesive because they will coordinate and compliment one another. If you post random pictures with no thought of the color scheme, then your feed will look like a disorganized and jumbled up bunch of randomness.
If I’m being honest, I really struggle with this one! I love all the colors, and it’s hard to only post certain ones! I find that my feed ebbs and flows from one color scheme to the next. Sometimes, I will have a period of olives and yellows, but that may change to teals and pinks as I start different projects. I think the important thing to remember is to be mindful of your feed when you are selecting colors for projects.
How?
First, you want to choose four to six colors that you feel speak to you and represent who are. Be sure to choose a balance of bold, medium, and neutral colors. Maybe your favorite color is green. You could choose two-three shades of green and then pick a complimentary color such as pink and a few neutrals like gold, white, and tan. Maybe you like the color combo of teal and coral. Choose two shades of each and then add in some black or gold or white. My main brand colors are pink and teal. I have two shades of each that I play with and my main accent colors are gold and off-white.

Once you have nailed down the colors that you are going to stick with in your feed, choose backgrounds and props that are within the color scheme. If you use the same background and props in your photos, they will be naturally cohesive without a lot of extra help from you. I have a pair of scissors, a few favorite crochet hooks, and a few plants that frequent my pictures. Kelsie of Crafting for Weeks has more tips on setting up a flat lay. Reference her blog post for more tips as you gather your materials.
There may be times when you want to take pictures outdoors or against a different background. You can still ensure that your pictures coordinate if your product is one of your brand colors or you snap your picture near something that is one of your brand colors.
Another thing to consider is that you may have a color palette for your logo and branding, but the color options that you offer in your products may be completely different! I’m a crochet designer. Even though my brand colors are pink and teal, I don’t necessarily use these colors when designing a sweater or beanie!
Being mindful of your color palette is the key! If you’re always thinking about it when you are curating your content, then your photos will come together and be complimentary to each other in your feed!
Tip #3 – Stick to a Posting Schedule
Why?
I should think the answer to why should be obvious here. You should have a posting schedule so your head doesn’t pop off the pillow every morning thinking, “Oh no…I have nothing to post today!” as you proceed to throw up some random ugly picture. Trust me, I have totally been there! Having a posting schedule helps you to stay organized and saves you time!
Staying Organized
Having a posting schedule helps you to organize your content down to the very last detail. You can get super organized and line up the columns and/or rows of your IG feed to be color coordinated, or you can simply make sure that everything is cohesive and that you have a nice balance of content.
Saving Time
Not only does having a schedule help you stay organized, but it also saves you time! It takes approximately 1-2 hours to plan a week’s worth of content in one sitting. It takes approximately 30 min to an hour every single day during prime posting time to take a picture, edit it, type up a caption (accidentally lose said caption inadvertently by tapping the wrong spot on your phone…tell me I’m not alone here), and finally publish your post for the day. That’s a savings of 1 1/2 – 3 hours that you can use to be productive elsewhere in your business!
How?
You may be thinking, “I know it’s important, but I can’t seem to get a plan in place,” or “I don’t have the time to schedule content.” Well, I’ve got you covered, my friend. In a live interview I had with Ashley at A Crafty Concept, she shared some tips for scheduling and planning content.
Having a balance in your content is very important. Ashley said that it’s very important that you aren’t constantly marketing your product to your audience day after day after day. People don’t want to constantly be solicited to whether it’s finished makes or new patterns.
Create categories for your content and spread them evenly throughout your schedule to keep your audience engaged. Here are some category ideas that Ashley shared with us:
- Marketing
- Encouragement/Inspiration
- Behind the Scenes
- Meet the Maker
- Tips and Tricks
- Community Promotion
- Your process
Using these categories and then creating posts for each category throughout the month will ensure that your content is balanced and appealing to your audience.
I hope that you found this post helpful! Remember, your feed is a reflection of you! Don’t settle for less than your best when marketing to your audience. Curating a beautiful, engaging feed will take time as you slowly post newly filtered photos with thoughtful captions day by day, but the end result will be worth it! It is so gratifying to scroll your own feed knowing that you have curated your best content to share with your followers. Not only will you enjoy looking at your feed, but more importantly, your customers will too!
Be sure to check out my post on the Importance of Lighting in Product Photography!

The photographs and content contained in this post are the property of A Plush Pineapple. Unauthorized reproduction, in whole or in part, or distribution of this pattern or content is prohibited.