Success is the ability to go from one failure to another with no loss of enthusiasm.
-Winston Churchill
Have you ever worked on a project and felt that every step you made was a mistake?

This pattern was one of those projects! Every bit of progress was made with two steps forward and one step back.
I had reached a point in designing where I knew what I wanted each pattern to represent to the world. I wanted every design to be a representation of me and my love for all things tropical. So, I decided to try and create a NEW stitch pattern that would have pineapple-esque texture! Wow, that sounds easy, right? Just make up a new stitch pattern, right? I soon found out that long before I would be basking in after-yarn glow, I would face some serious trial and error.
Trial
First, came the trial portion of this pineapple pullover. What stitch should I use? Bobble stitch? No, too…bobble-y. Shell stitch? Maybe, but how? V stitch? Puff stitch? Crochet cables? The options were overwhelming! I finally settled on puff stitch for the pineapple body and a modified shell stitch for the fronds.
Error
The next stop of this design train was error, and boy, did my train stay at this station for a while! After countless edits and size changes and re-writes, I still found myself editing and changing sizes and re-writing the pattern. Issues that came up in the tester group had to be fixed. Problems with the design that caught my eye after they had finished testing still needed to be adjusted. Not to mention that while I was finishing the final pineapple pullover, I kept making silly mistakes and having to frog way more that necessary! When will I learn to count my stitches when it matters most?
Success
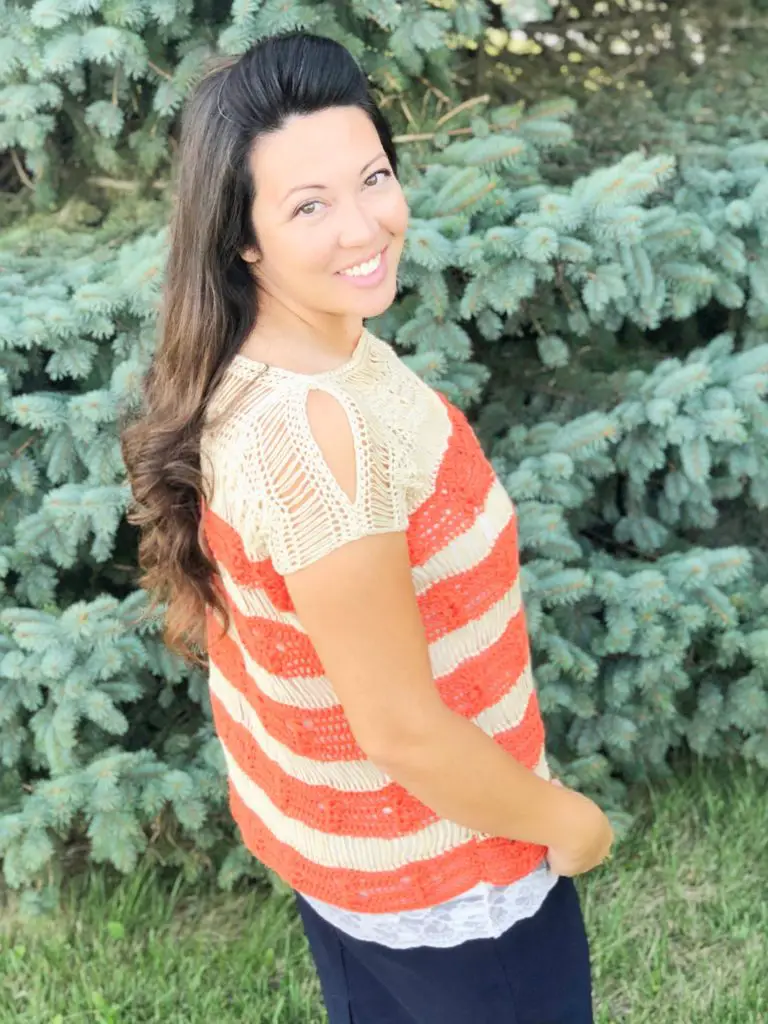
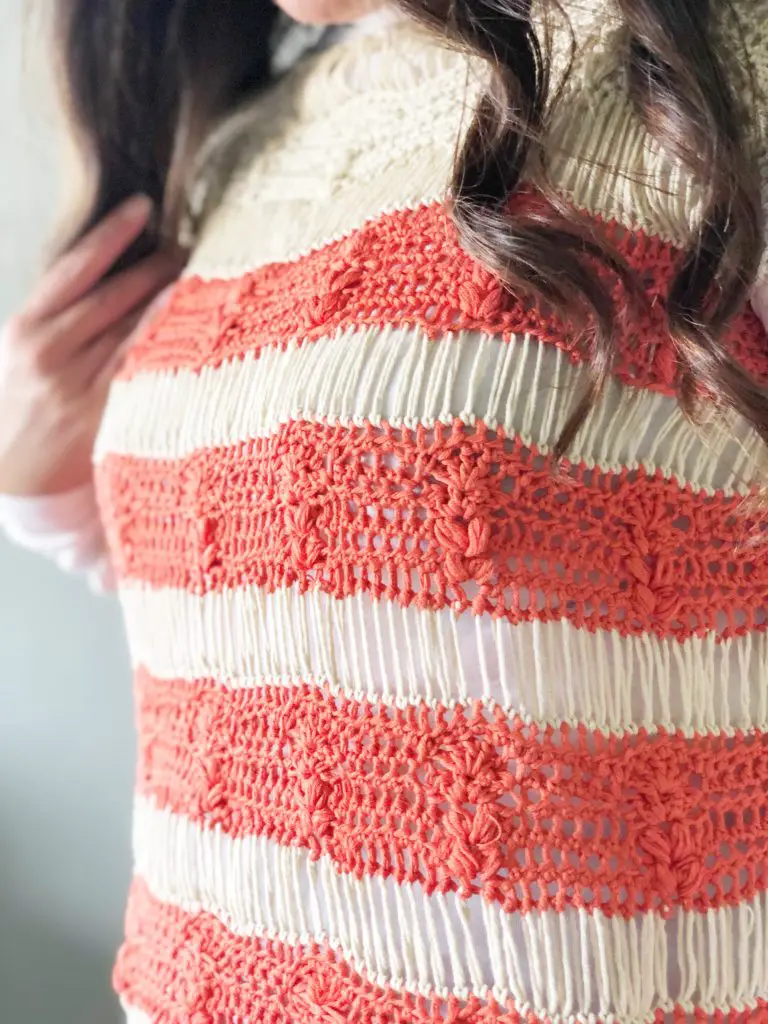
After all of this trial and error, a beautiful design that is flattering and versatile finally emerged. I mean, I am absolutely in love with the texture of this pineapple pullover! The little pineapples all in rows are just too cute for words.
Texture
These textured pineapple rows combined with the drop stitch provides such a beautiful contrast of complex versus simple! Not only is the texture amazing, but the fit is flattering!
Fit
This is one of those tops that you can layer over a tank or a turtleneck and hide the evidence of those snacks you’ve been binge-eating. It is also versatile! It is light and cool enough for summer when worn with a tank, but it can also be combined with a turtleneck, light jacket, and boots for a cute fall look!

Even though this design was my most difficult, it is by far the one that I am the most proud of! I have put countless hours into pattern editing, progress pictures, and even filming my first stitch tutorial videos to make this pineapple pullover pattern available on my blog! So without further ado, I present to you…
…the Poppin’ Pineapple Pullover!

Skill Level – Intermediate
Disclaimer: This post contains affiliate links to the products used in this project. If you make a purchase through any of these links, we will get a small commission at no additional cost to you.
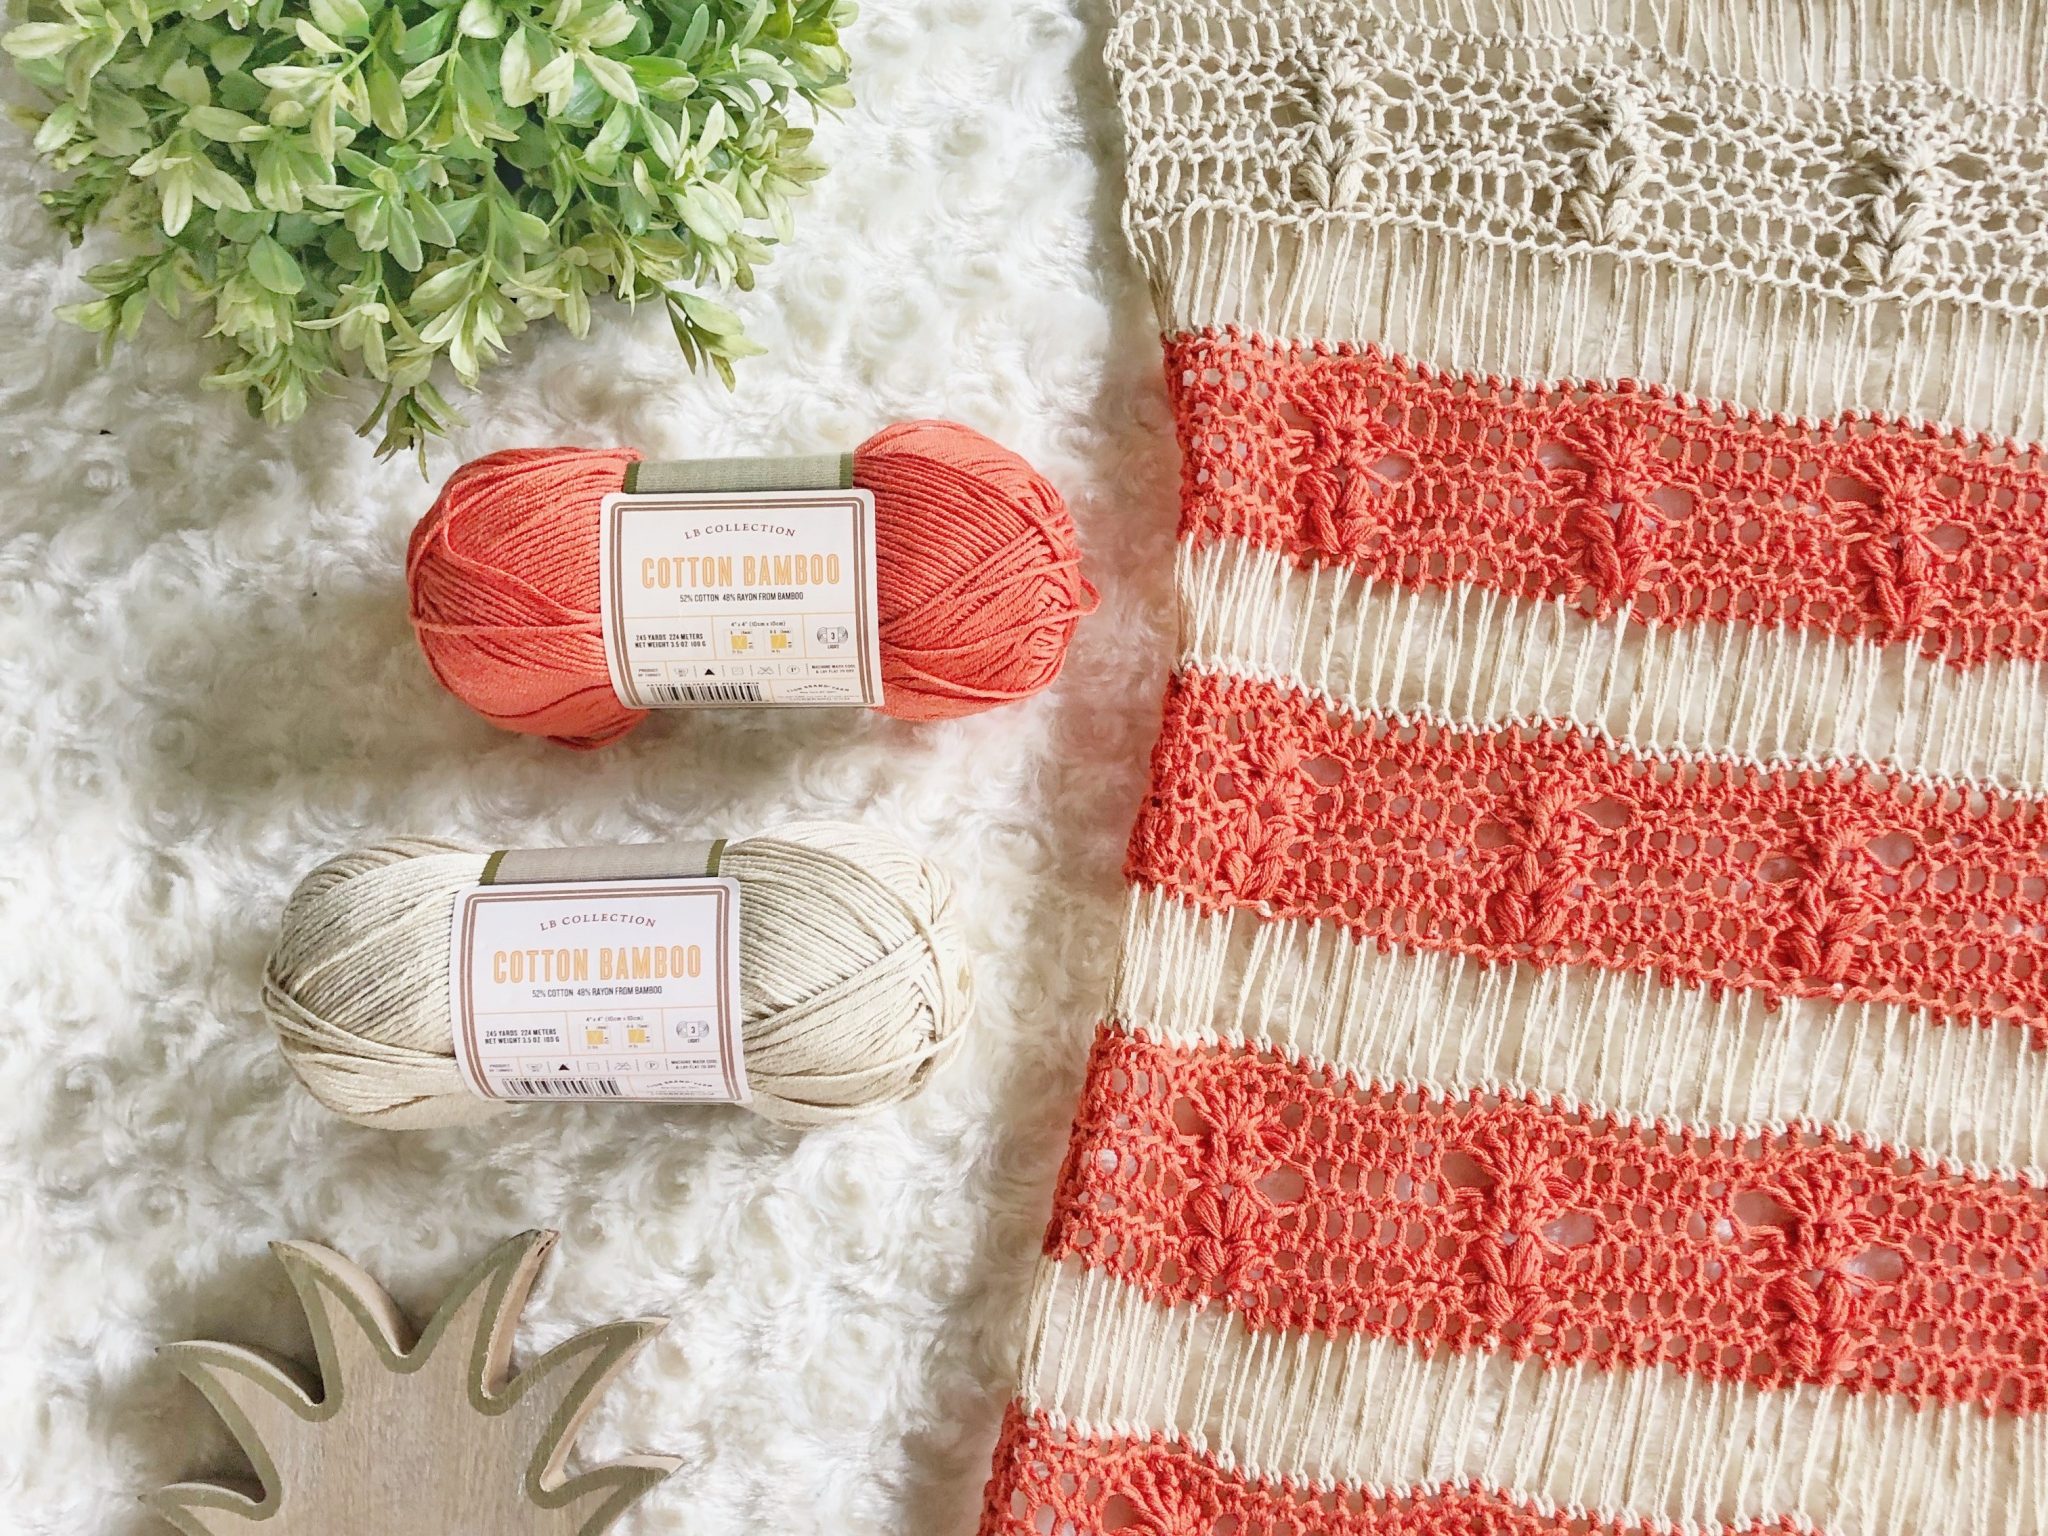
Materials
- Size 7/4.50 mm crochet hook
- Light (3) weight yarn—I used Lion Brand’s Cotton Bamboo
- Approx 690 (710, 730) yards
- Tapestry needle
- Scissors
- Ruler—This is the one that I used to attain the finished measurements.
Abbreviations
- CH – Chain
- SK – Skip
- YO – Yarn over
- HDC – Half double crochet
- PS – Puff stitch
- DC – Double crochet
- FP DC – Front post double crochet
- BP DC – Back post double crochet
- DS – Drop stitch
- WS – Wrong side
- RS – Right side
Gauge
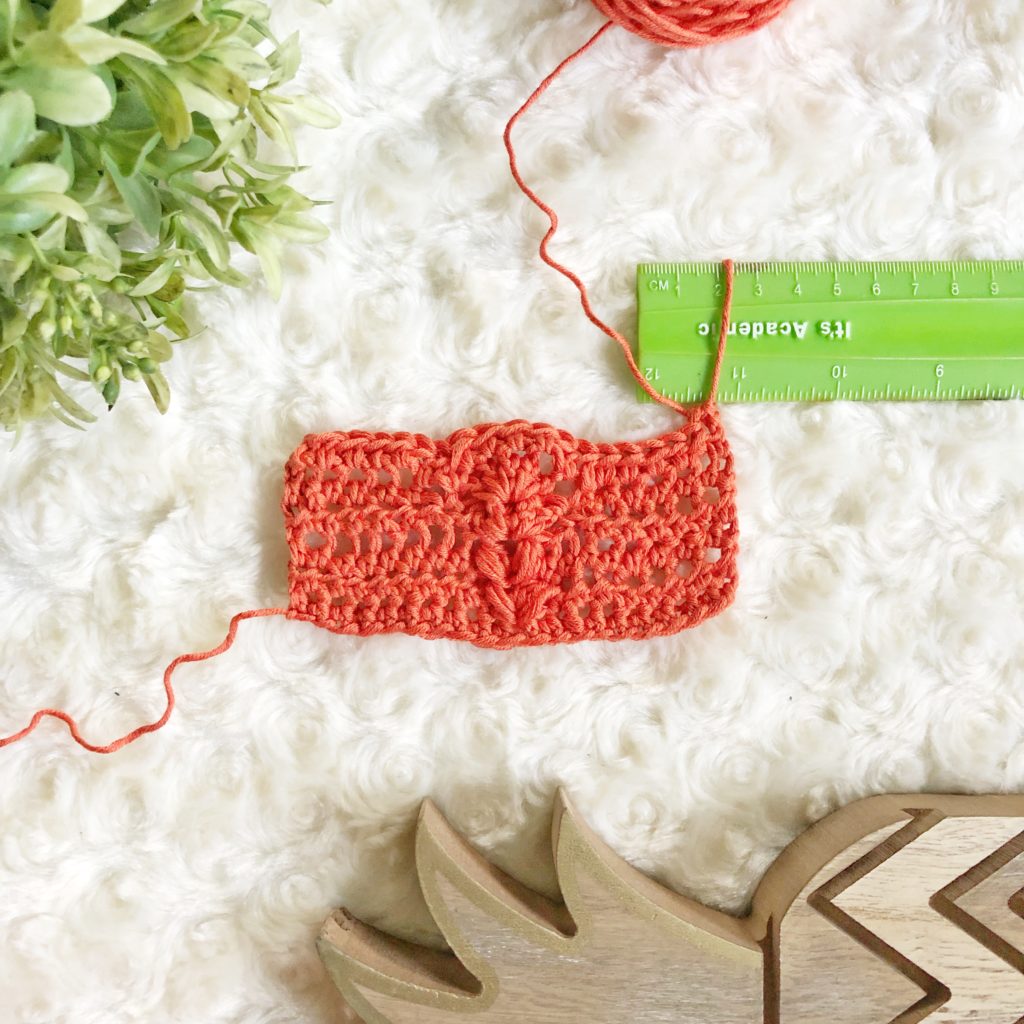
- Pineapple Row Gauge: 4 ½” x 2 ½” = Sample swatch as follows:
- Row 1: CH 20, working in the back bump of the chain, HDC in 2nd CH from hook and in every CH across. (19)
- Row 2: 8 HDC, SK 1, [PS, CH 1, PS], SK 1, 8 HDC. (19)
- Row 3: Repeat Row 2. Place the [PS, CH 1, PS] in the CH 1 space of previous row. (19)
- Row 3: 6 HDC, SL ST, SK 2, 5 DC in CH 1 space of previous row, SK 2, SL ST, 6 HDC. (19)
- Row 4: 6 HDC, SL ST, SK 2, 5 FPDC around the 3rd DC post from the previous row, SK 2, SL ST, 6 HDC. (19)
- Row 5: HDC in each stitch across. (19)
- Drop Stitch Row Gauge: Drop stitch height should be 1 ½”
- BE SURE TO CHECK YOUR GAUGE – Gauge is crucial in this project in order to ensure fit.
Measurements
- Finished measurements BEFORE BLOCKING are as follows:
- XS/SM – 38″ Hips, 20” Length
- M/L – 39 ½” Hips, 21” Length
- XL/XXL – 41” Hips, 22” Length
- Finished measurements AFTER BLOCKING are as follows:
- XS/SM – 41-42” Hips, 24” Length
- M/L – 42 ½”-43 ½” Hips, 25” Length
- XL/XXL – 44-45” Hips, 26” Length
Notes
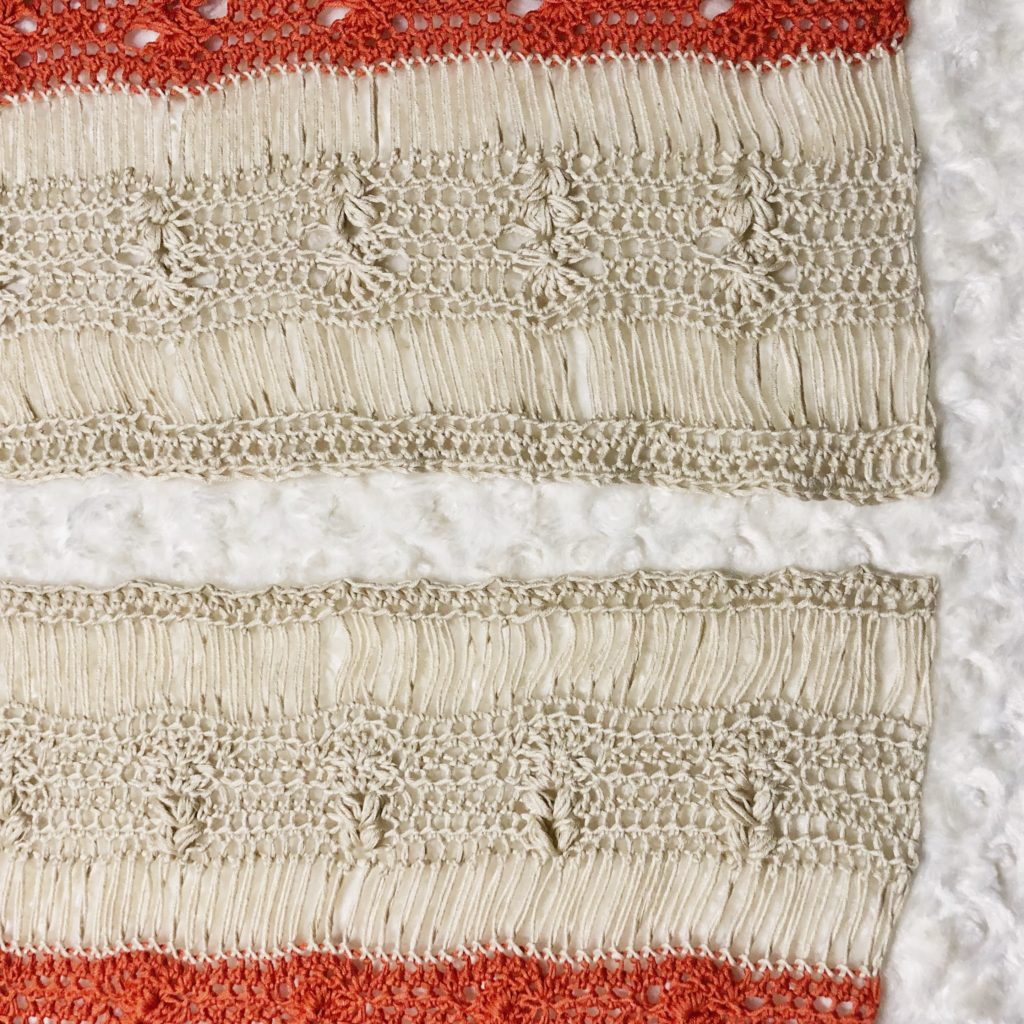
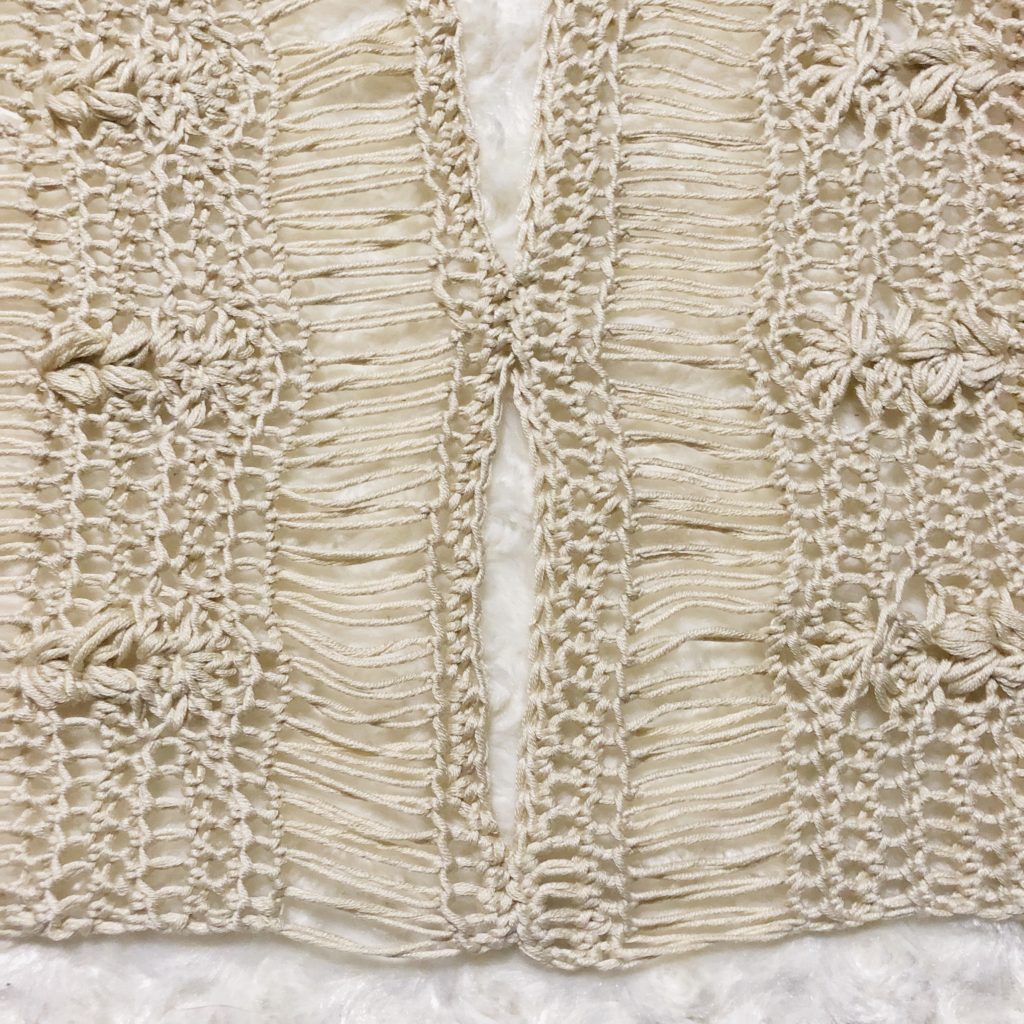
- This pineapple pullover is designed with approximately 7 inches of positive ease in the hip measurement. It is meant to be loose and oversized. Please keep this in mind when selecting yarn. You will want a yarn that has nice drape and will not be stiff. Lion Brand’s Cotton Bamboo yarn provided excellent drape and has a beautiful sheen.
- This garment is made from two rectangular panels that are crocheted as flat pieces from the bottom up back and forth in rows. The panels are then seamed together at the shoulders and on the sides.
- Beginning CH stitches do not count as a stitch.
- Size changes are in parentheses XS/S, (M/L, XL/XXL) respectively.
- This pattern repeats the same seven rows until the desired length is reached. On every other Row 5 you will alternate a FPDC and a BPDC in the center of each cluster. Use FPDC when on the right side of the work and a BPDC when on the wrong side of the work.
- If you have any difficulty completing this pineapple pullover and would like support, please email me at theplushpineappleshop@gmail.com
Blocking
This garment is designed to be blocked before seaming. There are several reasons why blocking is beneficial for this design.
- Blocking will help the dropped stitches to look straight versus wavy and wrinkled.
- Blocking will help to open up the “pineapple” stitches to accentuate the design.
- Blocking will improve the overall drape and fit of the garment as it is meant to be oversized and loose.
Special Stitches
Puff Stitch
- YO, insert hook into desired stitch and pull up a loop (3 loops on hook).
- *YO, insert hook back into stitch and pull up another loop (5 loops on hook).
- YO, insert hook back into stitch and pull up another loop (7 loops on hook).
- *YO, pull through all loops on hook.
- DO NOT chain one after the final pull through.
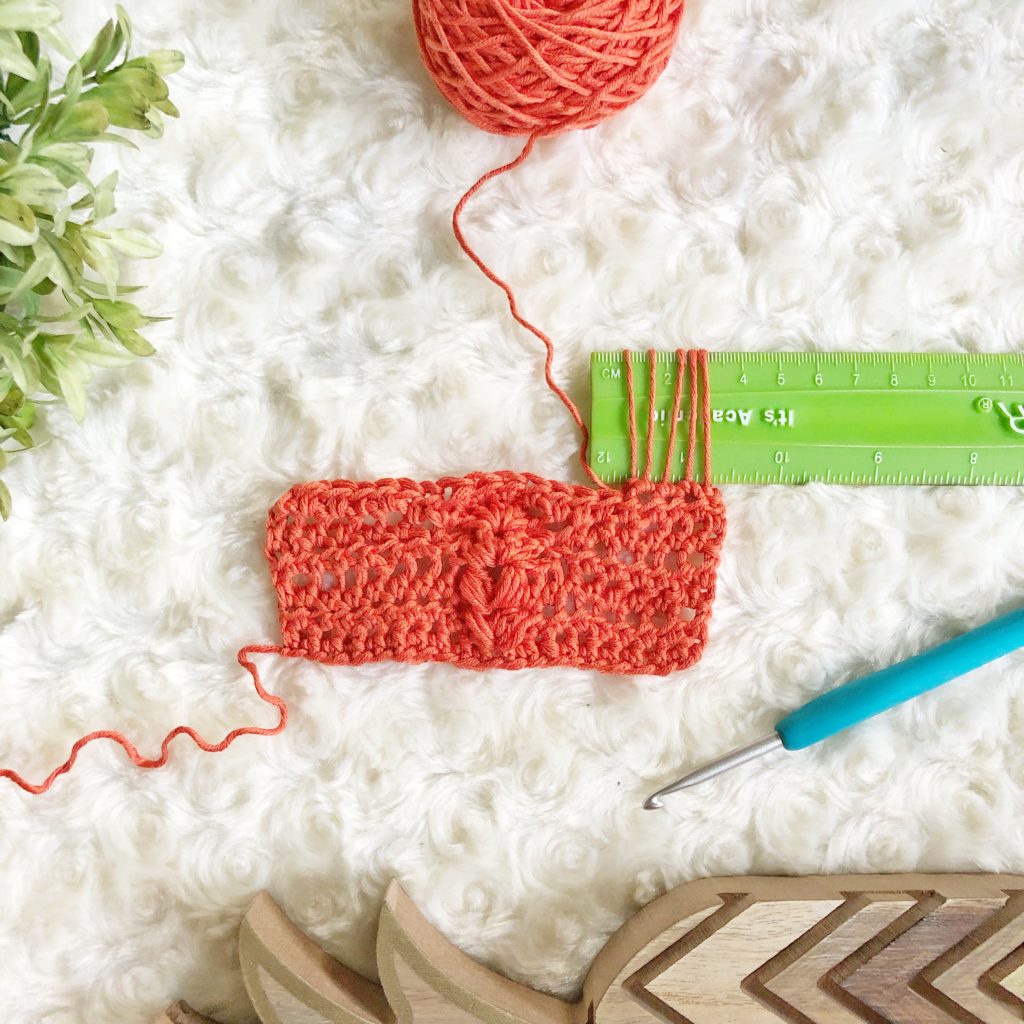
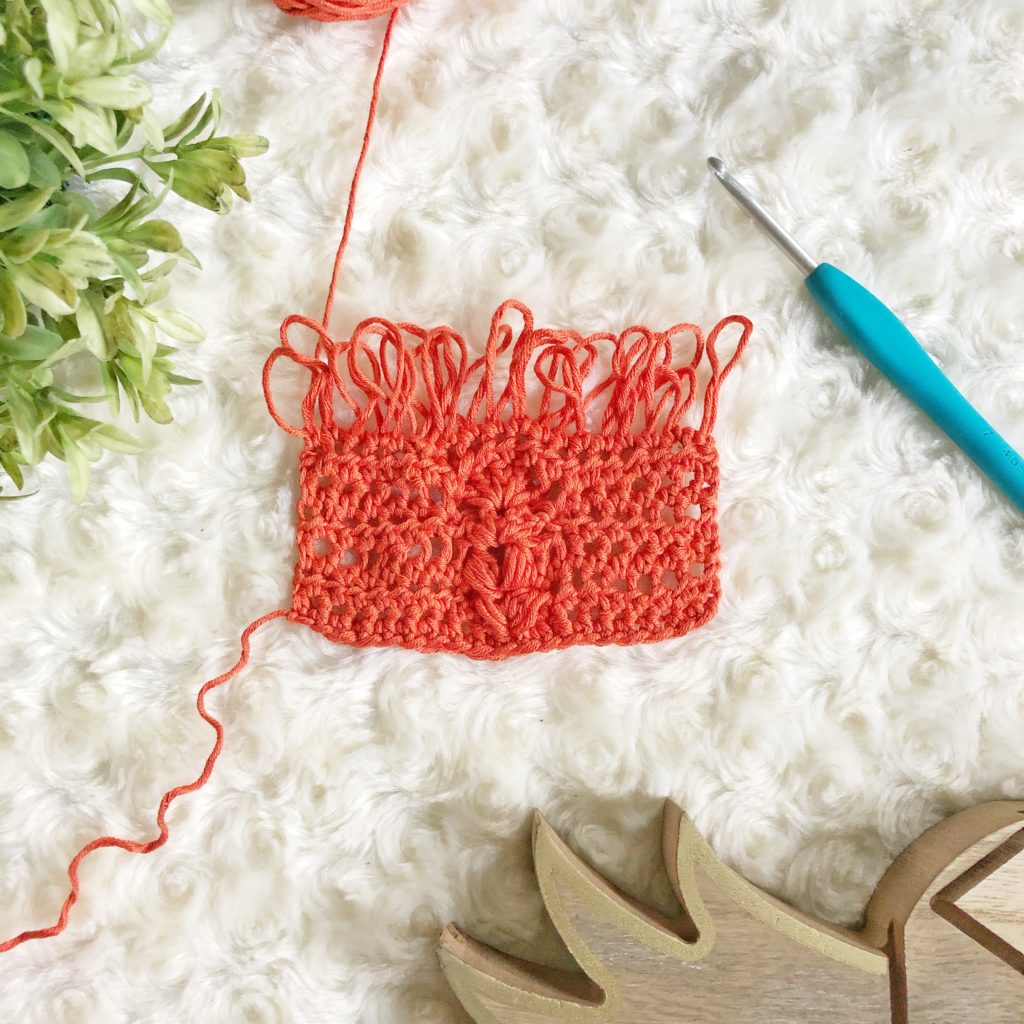
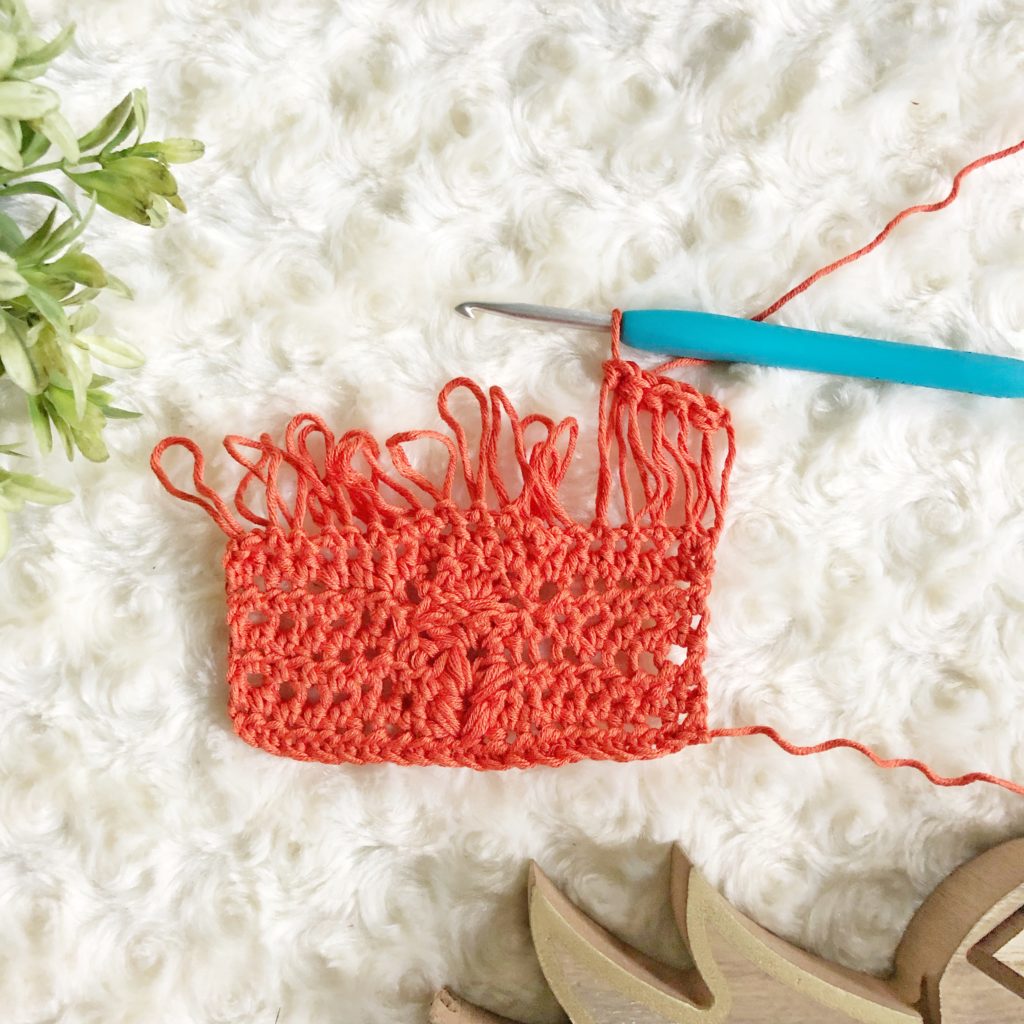
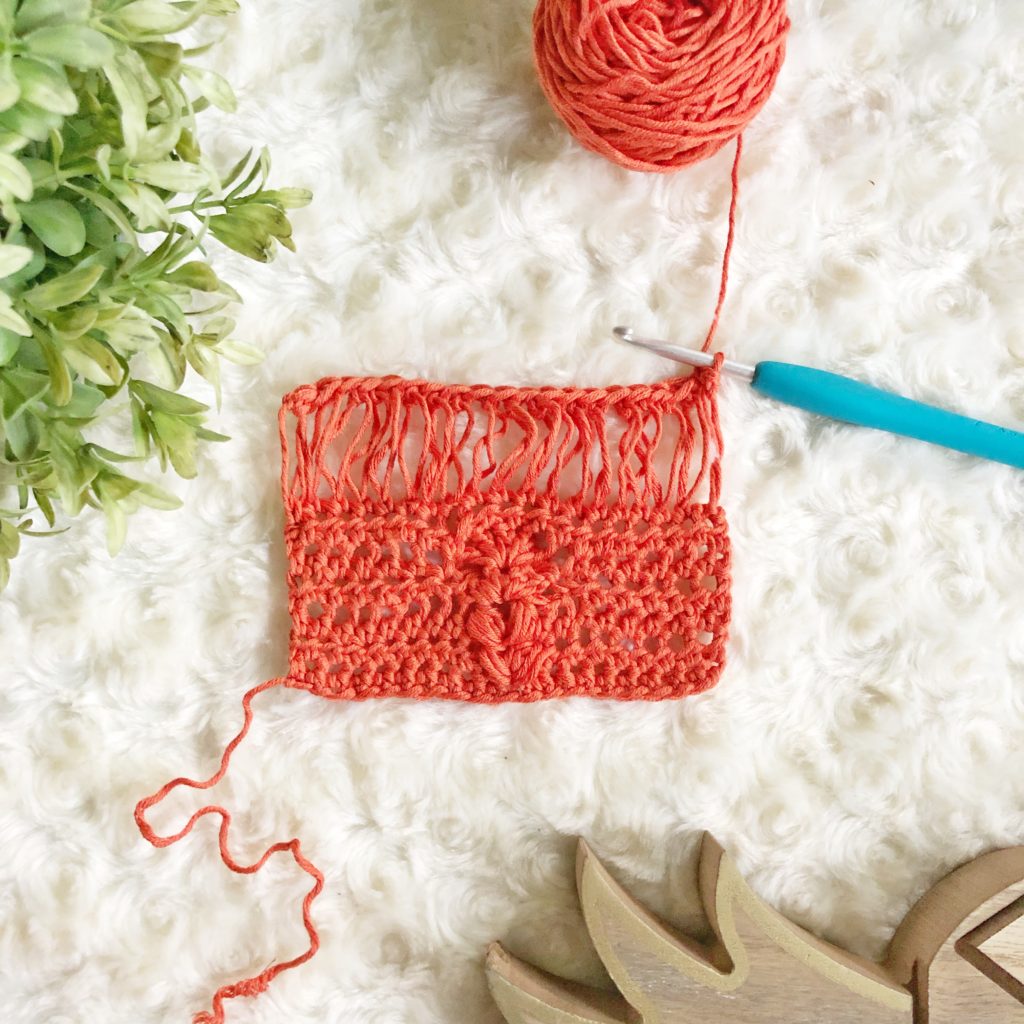
Drop Stitch
- In this pattern, a ruler is used to achieve the height of the dropped stitch. The ruler that was used to achieve the final measurement was 1.25” tall. If your ruler doesn’t match that height, then your final length may vary. You may choose to add additional rows to achieve the same final length.
- Insert hook into desired stitch and CH 1. (On the first stitch of the row, SL ST instead of CH since there will be a loop already on the hook.)
- With the ruler to the right of the work, stretch the loop on the hook around the ruler.
- Remove the hook from the loop leaving the loop on the ruler.
- Pull the loop snugly on the ruler, but NOT too tight.
- Insert hook into the next stitch and repeat.
- Remove the stitches from the ruler every 5 stitches or so to avoid having to slide the stitches all the way down the ruler. Reinsert the ruler in the last loop worked before continuing.
- When working the next row, place a stitch in the top of each loop as you would a normal stitch.
Pattern
Body Panel (make two)
Row 1: CH 75 (82, 89), working in the back bump of the CH, HDC in the 2nd CH from hook and in the next 73 (80, 87) CH. (74, 81, 88)
The stitch count for each row remains the same from this point forward.
Row 2: CH 1, turn, *HDC in next 8 (9, 10) stitches, SK next stitch, (PS, CH 1, PS) in next stitch, SK next stitch,* repeat from * to * until 8 (9, 10) stitches remain, HDC in last 8 (9, 10) stitches.
Row 3: Repeat Row 2. You will be placing the (PS, CH 1, PS) in the CH 1 space from the previous row.
Row 4: CH 1, turn, HDC in next 2 stitches, *HDC in next 4 (5, 6) stitches, SL ST in next stitch, SK next two stitches, 5 DC in the CH 1 space between the 2 PS from the previous round, SK next two stitches, SL ST in next stitch* repeat from * to * until 6 (7, 8) stitches remain, HDC in last 6 (7, 8) stitches.
Row 5: CH 1, turn, HDC in next 2 stitches *HDC in next 4 (5, 6) stitches, SL ST in the SL ST from the previous round, SK next 2 stitches, 5 FPDC around the post of next stitch (the middle DC of the previous round), SK next 2 stitches, SL ST in the SL ST from the previous round* repeat from * to * until 6 (7, 8) stitches remain, HDC in last 6 (7, 8) stitches.
Row 6: CH 1, turn, HDC in every stitch across.
Row 7: CH 1, turn, DS in every stitch across.
Row 8: CH 1, turn, HDC in every loop across.
Row 9-11: Repeat Rows 2-4.
Row 12: CH 1, turn, HDC in next 2 stitches *HDC in next 4 (5, 6) stitches, SL ST in the SL ST from the previous round, SK next 2 stitches, 5 BPDC around the post of next stitch (the middle DC of the previous round), SK next 2 stitches, SL ST in the SL ST from the previous round* repeat from * to * until 6 (7, 8) stitches remain, HDC in last 6 (7, 8) stitches.
Repeat Sections
Row 13-15: Repeat Rows 6-8.
*Row 16-22: Repeat Rows 2-8.
Row 23-29: Repeat Rows 9-15.
*Row 30-36: Repeat Rows 2-8.
Row 37-43: Repeat Rows 9-15.
*Row 44: CH 1, turn, HDC in every stitch across.
Proceed to correct size.
Size XS/SM
Row 45: CH 1, turn, HDC in every stitch across. (74).
Finish off. Weave in ends.
Size M/L
Row 45-46: CH 1, turn, HDC in every stitch across. (81).
Finish off. Weave in ends.
Size XL/XXL
Row 45-47: CH 1, turn, HDC in every stitch across. (88).
Finish off. Weave in ends.
Blocking
Block each panel to the desired measurements. Use the smaller measurement for the smaller hip size and vice versa. For instance, if making an XS, block one panel 20 ½” wide. If making a SM, block one panel 21” wide. Here is the finished measurement chart again for reference. You can also find this in the notes section. There is no variation for the length for each size. Block the length according to the size desired.
- XS/SM – 41-42” Hips, 24” Length
- M/L – 42 ½”-43 ½” Hips, 25” Length
- XL/XXL – 44-45” Hips, 26” Length
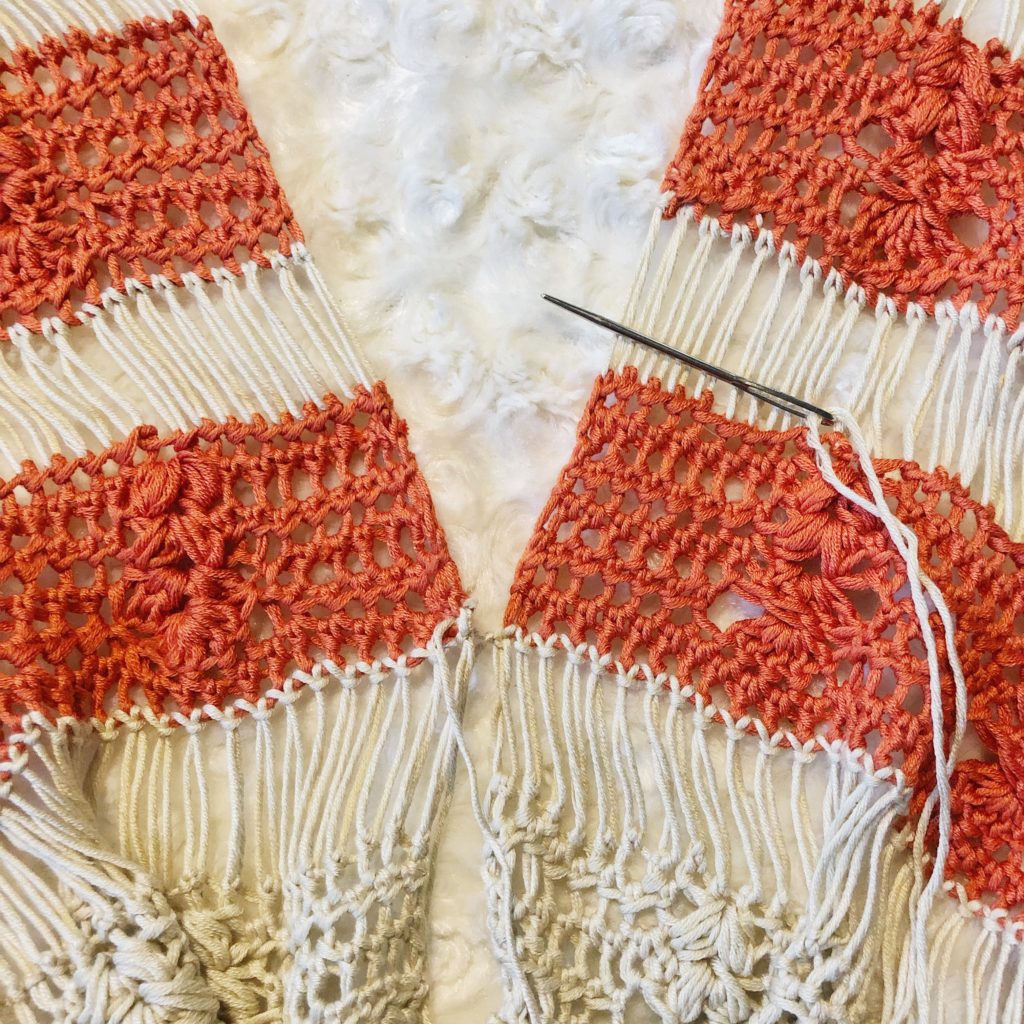
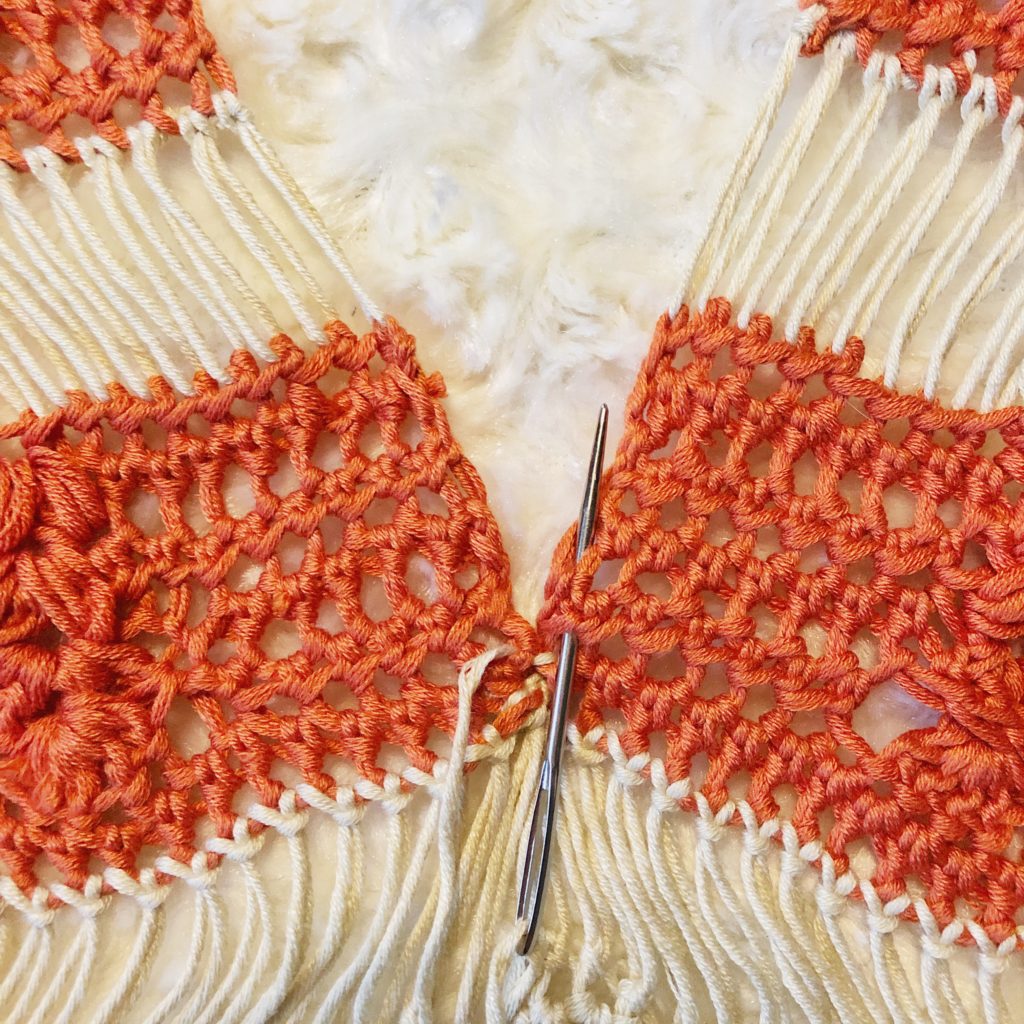
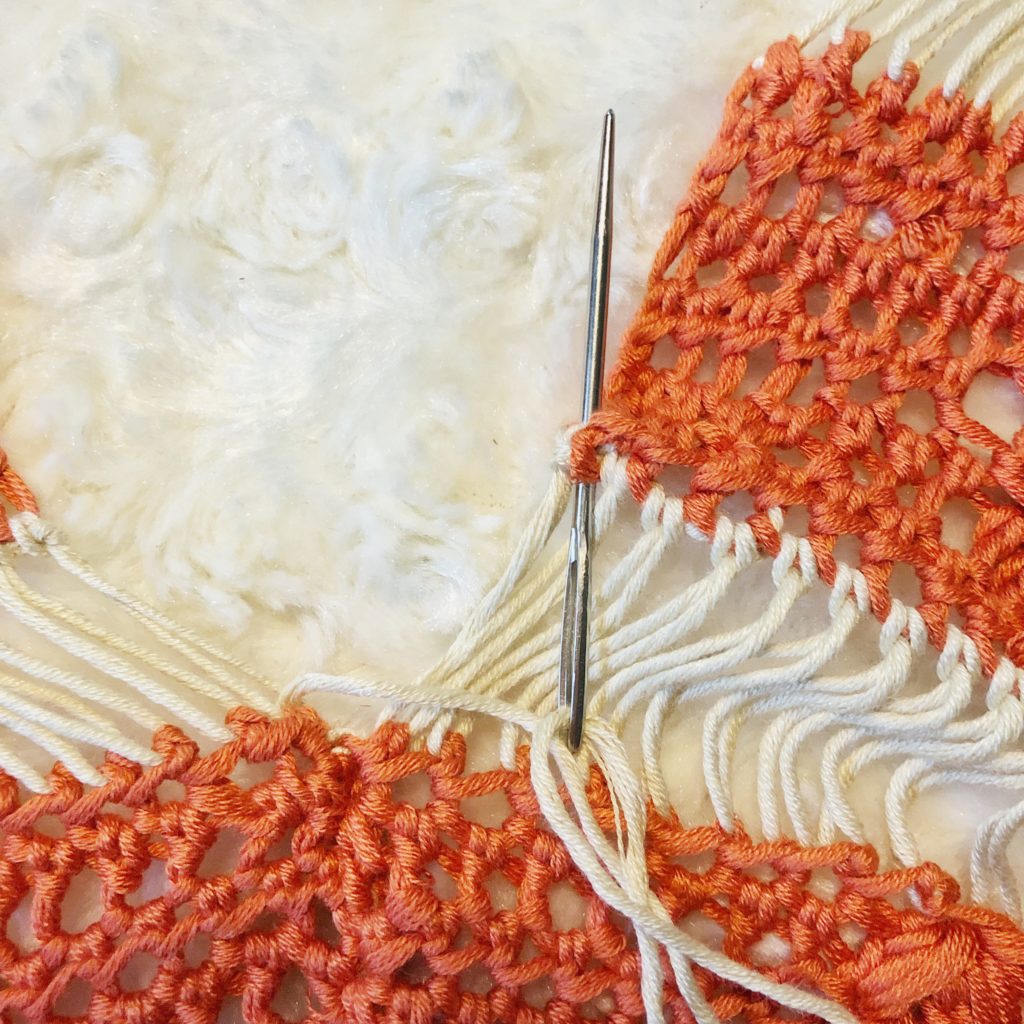
Seaming
Shoulders
Lay both panels right sides up top edges touching.
Using the mattress stitch, stitch together 5 (9, 13) stitches from the outer edge to the center on each side.
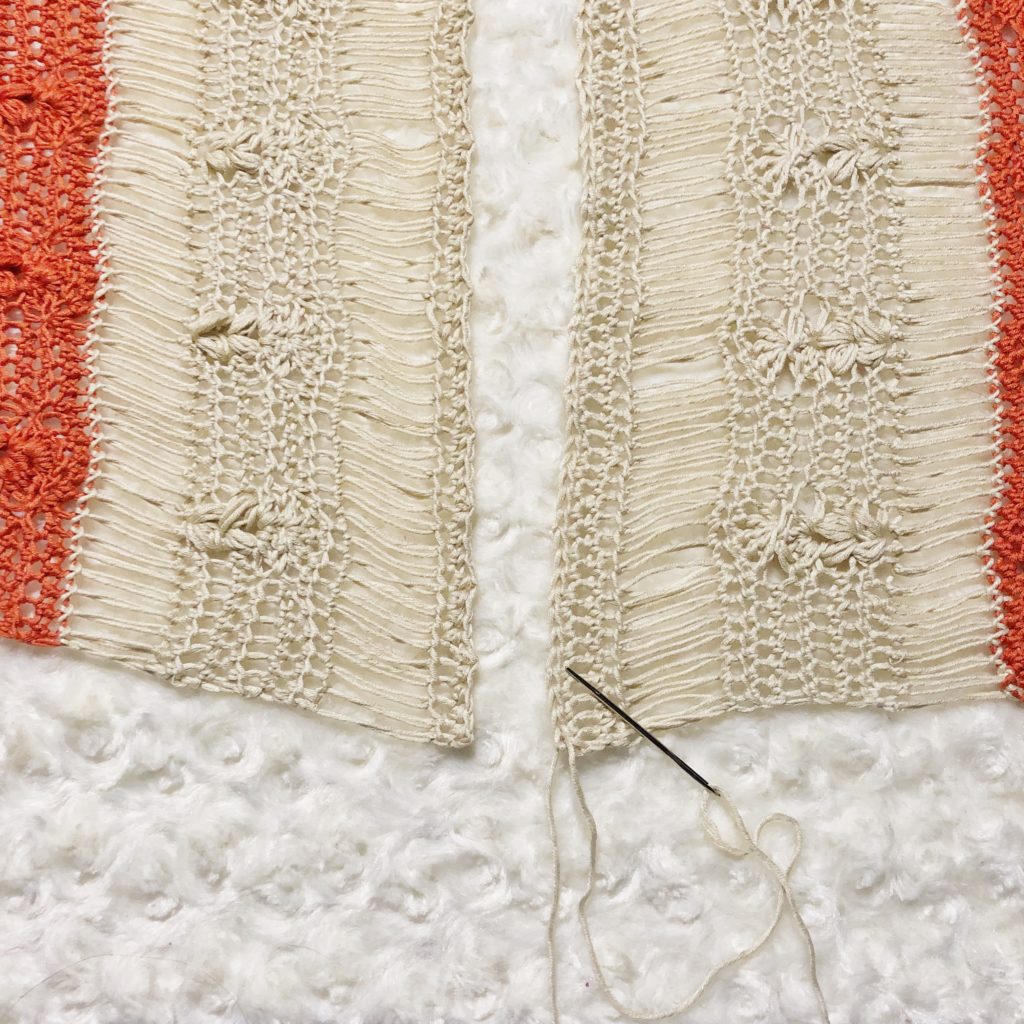
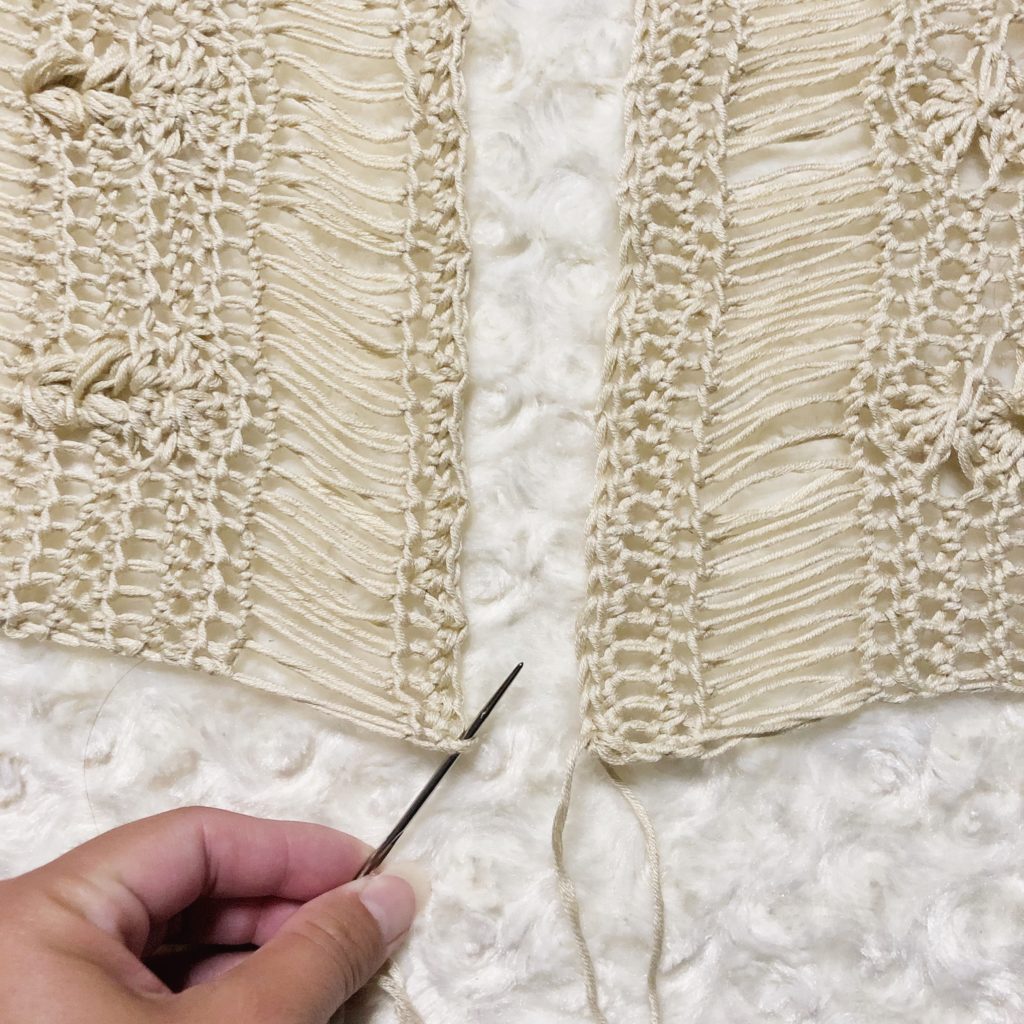
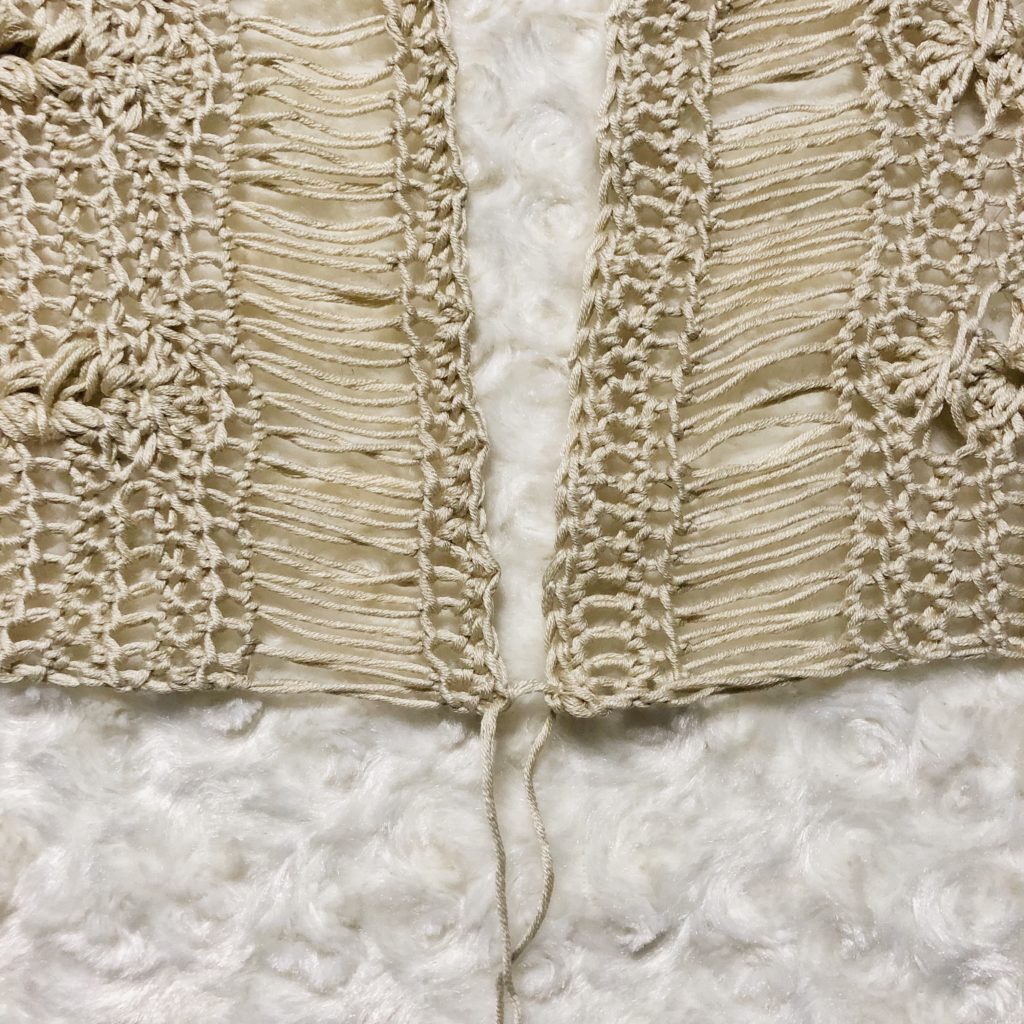
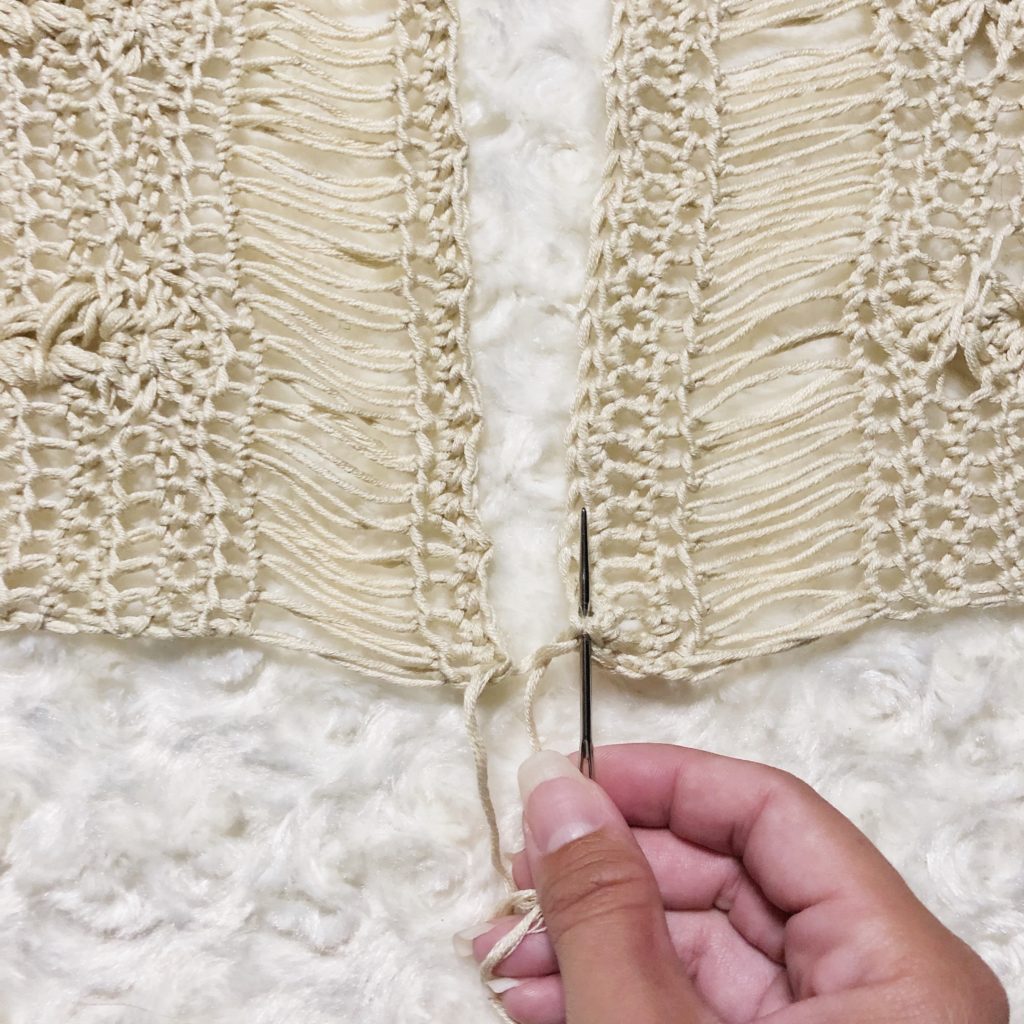

After seaming 5 (9, 13) stitches, cut the yarn. Count 15 stitches over and join yarn. Resume mattress stitch and stitch together 5 (9, 13) more stitches.
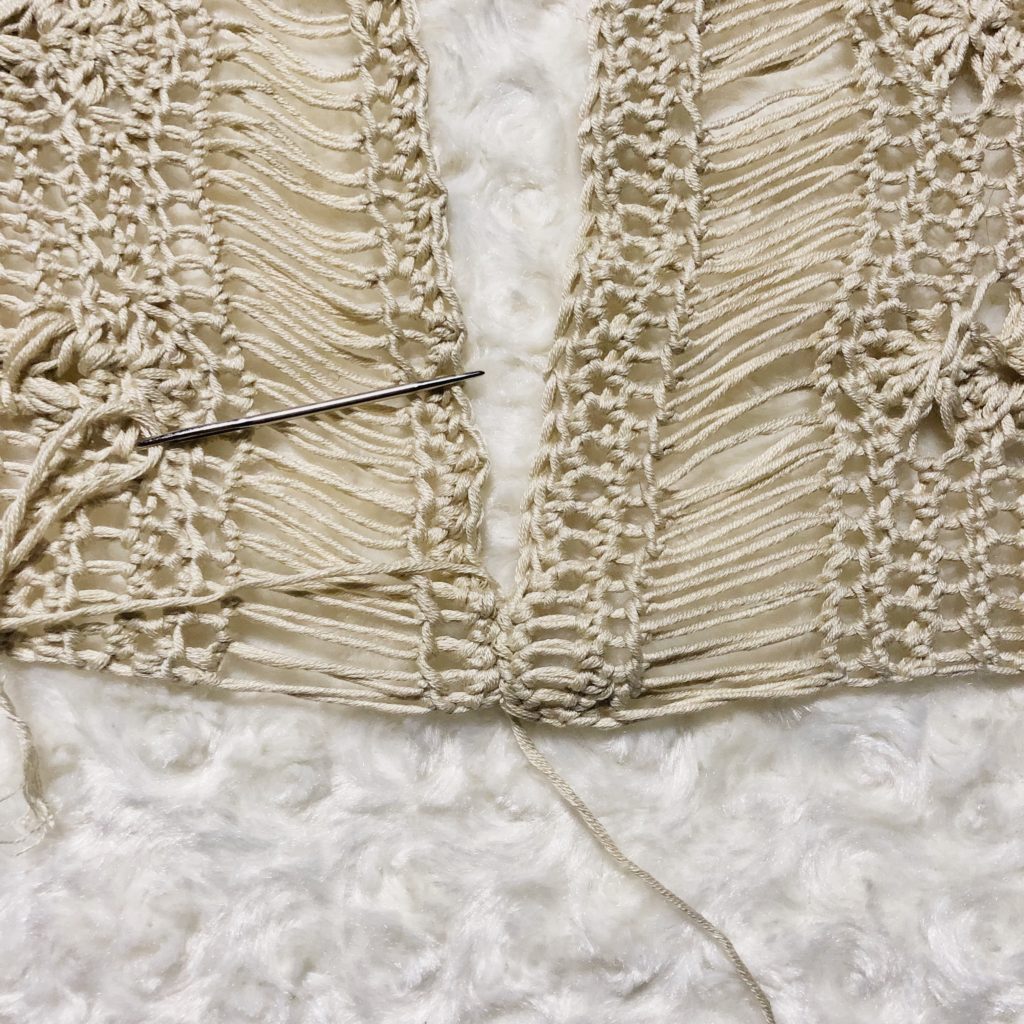
Sides
With right sides facing up, begin at Row 37 and using the mattress stitch, stitch all the way down to the bottom edge being sure to line up the rows as you go. I recommend ending your stitching at the bottom edge to ensure that your rows have lined up correctly.
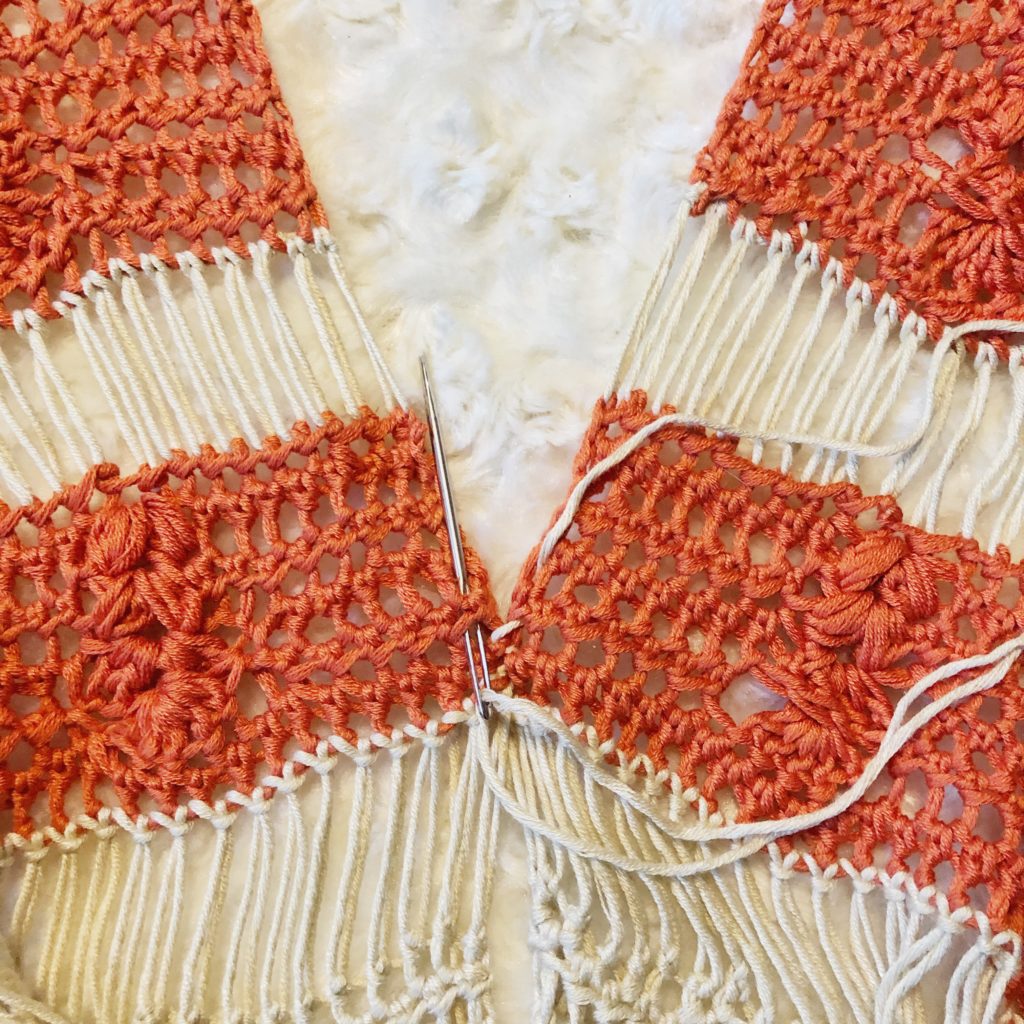
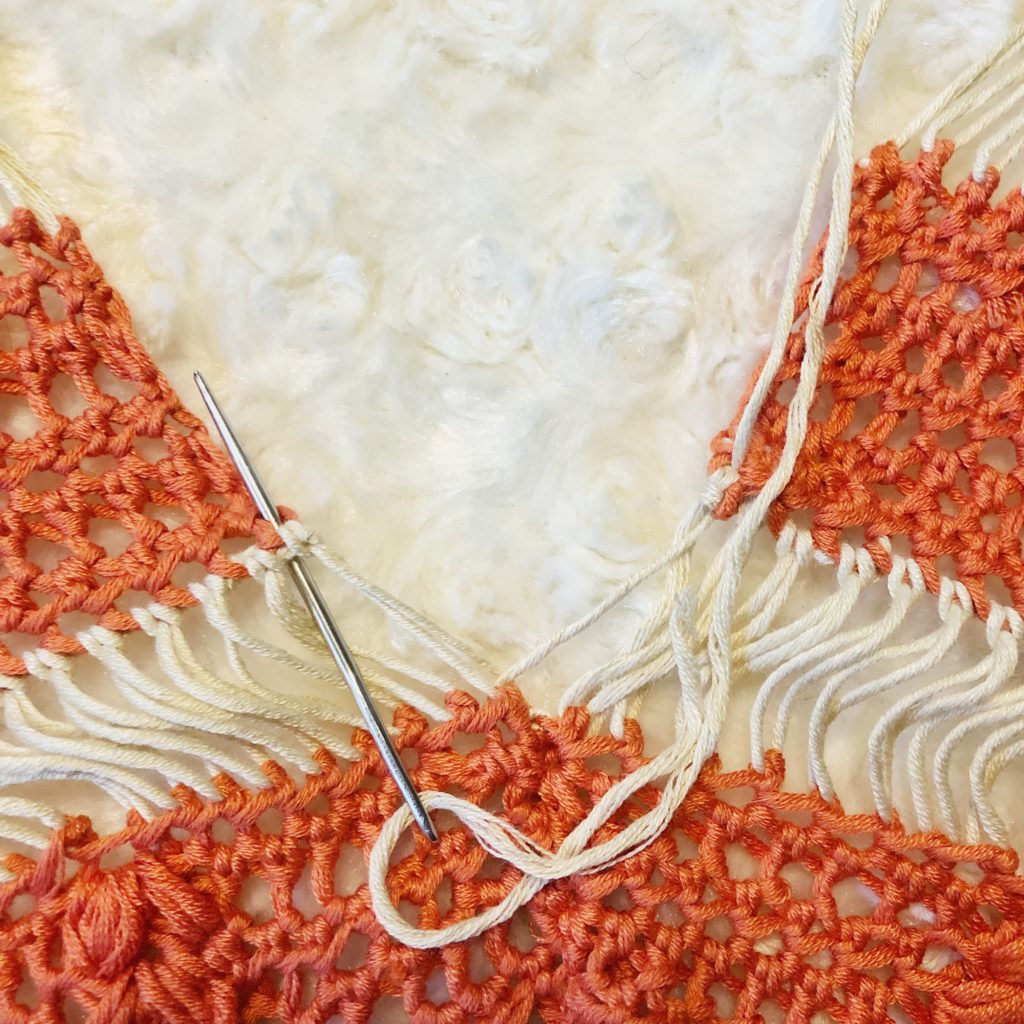
It can get tricky on the dropped stitch rows. Continue the same technique but don’t pull it super tight. Pull it enough to make the yarn on the needle the same length as the loops on the dropped stitch.
Finish off and weave in ends.


Be sure to check out The Pineapple Tee for another great crochet top pattern!
If you make this pineapple pullover, please share it! I would love to see your work! You can tag me on Instagram and Facebook @theplushpineapple. Use the tag #theplushpineapple.
“Much love, sunshine, and pineapples”
Sarah
The photographs and pattern contained in this document are the property of A Plush Pineapple. Unauthorized reproduction, in whole or in part, or distribution of this pattern or content is prohibited. ALL FINISHED PRODUCTS created using this pattern may be sold locally or online. If selling finished products online, please give my blog credit for the pattern by posting a link to my website.